
![]()
Like 1 in 8 humans alive right now, my existence is currently an unending chain of video conferences. However, just because you can’t go outside without killing everyone you’re ever loved, that does NOT mean that you can’t play with your Space Men!
Behold: ZOOMFINITY.

Here’s what you’re looking at:
- The board is half-scale (2ft x 2ft). All measurements in-game are accordingly also cut in half.
- The terrain is flat craft foam, with implied heights and a relatively simple abstract LOF system for determining who can see what.
- A webcam is suspended in the air over the game board.
- My opponent’s army is proxied (since I likely don’t have the exact models they want to play).
- I connect to my opponent through Zoom. They tell me where to place and move their dudes, and we both roll our own dice.
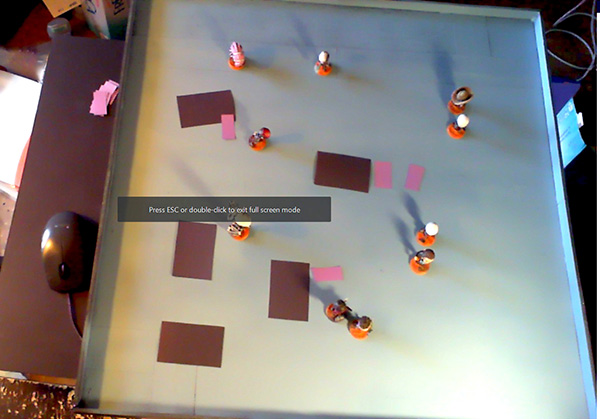
I’ve played 3 games this way in a week, and I have to say that it is scratching a lot of my Space Men itches during this annoying period in human history. 🙂 Here’s a recording of a 4-player game we played last night (which I streamed on Twitch, because at that point, why not):
Watch 2020-04-17 – Friday Night ZOOMFINITY! from capspud on www.twitch.tv
I heartily recommend a setup similar to mine for anyone who wants to try playing Infinity over the Internet. You don’t need much to get started; I made a pretty elaborate version of everything (because I’m me), but I’ll give some suggestions for lo-fi equivalents that will still completely do the job for you.
Thing #1: Webcam and Video Conferencing Software
The most essential part of this setup is “a way to stream video over the Internet”. That has two components– a camera that you can move around (so, a camera built into the screen of your laptop won’t really help), and some software to stream it through.
The webcam I have is pretty average– it can stream at 720p, which is about the minimum I would recommend to be able to pull this off. Any lower-res, and the models on the board will be too hard for your opponent to make out. If you don’t have an external webcam for your computer, you can easily swap in your phone camera (though these are slightly heavier, so you may need slightly sturdier support to hold it up– more on that below).
Next, you need software to talk to your opponent and share your camera stream. I’ve been using Zoom because my company provides it to me for free, but you can just as easily use Skype or Facetime or whatever else you turn up in a Google search for “free video conference software“. 😛
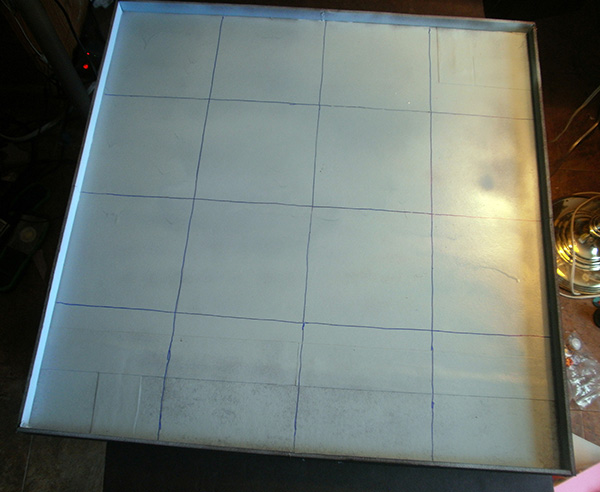
Thing #2: Half-Scale Board
When I started thinking about how to stream games, I assumed that I would be using a normal 4×4 board and the bins of normal Infinity terrain that are my current Quarantine Buddies. However, this would require me to suspend the camera extremely high above the board to capture the entire surface, and the meager quality of my webcam would make the models too small and hard to pick out.
To solve this problem, I’ve been using a half-scale board with normal-sized models. This makes the models effectively double their normal size relative to the play space, which dramatically improves the remote player’s ability to pick out their location and identity.
I built my half-scale board out of some spare sheets of foamcore (which had some chunks cut out of them, requiring patches to be filled in). I was planning to film my games from an improvised setup in front of my computer desk, so I needed my board to be sturdy enough to hang off the edges of whatever I was supporting it on; if you’re doing something similar, you can use foamcore, plywood, or MDF, depending on what you have lying around your house.
If you’re a real human being with, like, a dining room table or whatever, you could alternately build a flimsier “playmat” out of bristol board, or even just mark off a 2×2 space with masking tape.

To satisfy my paranoia about accidentally knocking models off my tiny table, I cut out 1″ strips of foamcore to form a raised lip around the edge. I cut the core out of the bottom of my strips to help them attach better to the board, but this is optional– if you just hot-glue them straight down, they’ll hold just fine for these purposes.

And, bam! Half-scale board! 🙂
Note the patch seams along the bottom– foamcore comes in 20″ x 30″ sheets, so I had to cut a 4″ strip out of a second sheet to fill in the remaining space. To attach the various pieces together, I cut roughly 2″ strips out of black construction paper, and stuck them down across the seams with brushed-on, slightly thinned-down white glue. Remember to put paper across BOTH sides of the foamcore seam (top and bottom) to stop your additions from flopping around.
Thing #3: Suspender
The camera will need to be in a relatively stable elevated position to properly film your play surface. If you’re playing in the dining room setup described above, you might just be able to hang your phone from a chandelier or other light fixture. But for my desk setup, I needed to create a camera boom.
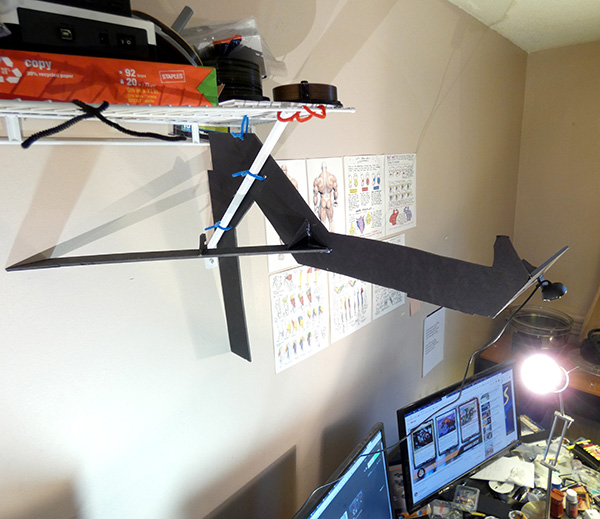
Here’s the one I built out of spare scraps of foamcore. It’s attached to my overhead shelving unit with pipe cleaners, and holds my camera in the correct position to see my board. Important elements of the design:
- It attaches to something sturdy. Foamcore and webcams aren’t heavy, so I just used pipe cleaners to grab the shelf struts; you could also use tie wraps, duct tape, or string.
- There is a supporting limb that hugs the wall going down from the attachment point, and a second limb that braces it against the wall to the left to prevent it from twisting.
- I did some experiments with hovering the camera in different locations BEFORE I built anything, to determine how far out I wanted it from the wall and how high up it needed to be. I then hacked the arm together so that it ended in the spot where I found the video framing to be the best.

At the end of the arm, I attached a flat panel with a groove cut into it along the bottom; this just lets me slide the camera left and right to adjust the frame as needed.
Oh, I guess one other element of this setup is “some stuff to hold up your board”. I just use a stack of terrain bins and various boxes.
The whole setup looks pretty dumb, but I live alone, so I am free from the inconvenient judgments of family members. 😛
Wheee!
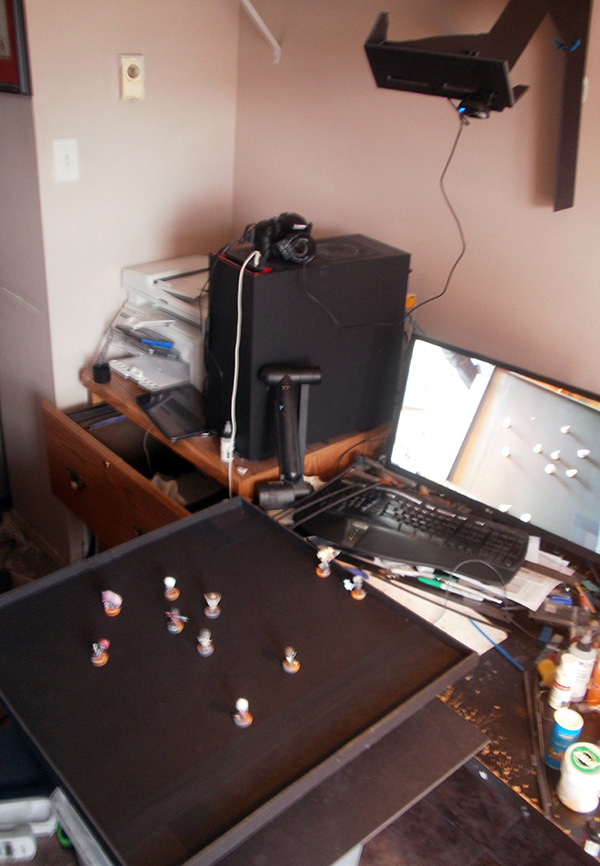
I spraypainted the surface a light colour to reduce the contrast against the models and terrain; long story short, webcams are kind of crap, and when there’s too much contrast in an image, everything gets spiked to “almost black” and “almost white”, which makes it very easy to tell where things are, but super difficult to tell what everything is. When the surface and the objects on it are similar tones, the camera will adjust better to a middle tone of lighting, making it far easier to see the true colours of the various components, and thus be able to tell the models apart.
One of the only adjustments to actual gameplay that I felt would be necessary in ZoomFinity is a small amount of pre-measuring. In physical Infinity, we develop a sense of how big the table in front of us is, and can make estimates for how far away a particular target may be. The digital presentation robs the remote player of that instinctive sense, so I opted to draw some grid lines onto the board to let them more easily gauge where they need to stand to take certain shots.
Alright, not too shabby. At this point we officially have a streamable play surface, but it’s looking a bit plain. Soooo, let’s move onto…
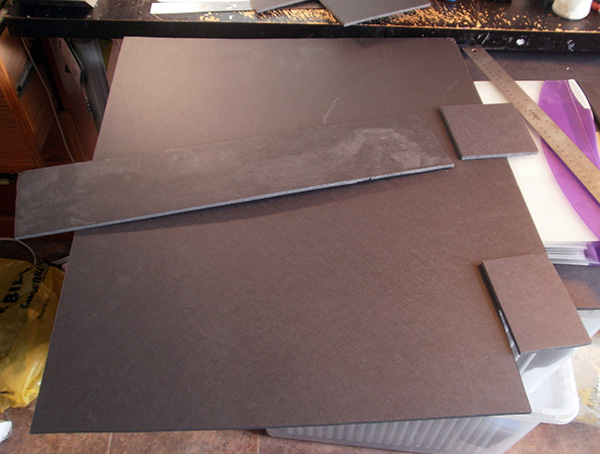
Thing #4: Half-Scale Terrain
If you have enough small scatter elements like crates and walls in your collection, you could probably assemble enough 3D cover to fill a 2×2 board. However, my terrain tends to be on the bigger side, so I decided to custom-build something more appropriate.
Beautiful 3D terrain setups are one of the biggest selling points for Infinity, and building them will always remain my favourite part of this hobby. However, for the purposes of a streamed game that is only seen from overhead, the 3D aspect isn’t really adding much, and depending on your terrain, could actually make it harder to spot models on the board. Adding in the fact that very little existing terrain will actually work at half scale, and the fact that building new half-scale terrain in full 3D would be fairly time-consuming for something that is (hopefully) only needed for a short time, made me conclude pretty quickly that flat 2D terrain would be the way to go.
Your flat terrain can be incredibly simple if you want; here I’ve chopped up some construction paper into squares that correspond with CB’s cardboard terrain buildings and crates from the starter boxes. If you want to get up and running really fast, something like this is probably your best bet.
However, if your brain is broken like mine, you might want to try something more stupid. 😛

My employer is, err, “gently suggesting” that all employees empty out their vacation banks by August (which, in the grand scheme of all the misery that people are enduring worldwide right now, is pretty far toward the trivial end of the burden spectrum), which for me means that I’ll be taking over a month off work in bursts between now and August. To fill that time productively, I’ve been planning out a new terrain set that I want to make.

I will get into the design of this terrain set in much more detail in future articles; for now, all that really matters is the block shapes, which I think are a really strong playable design which, crucially, plays nicely from overhead (since they won’t have modeled interiors). Basically, the board has a ground level, a raised level, and finally an “infinitely high” obstacle level that hems in LOF across the board. The set will be built in segments, with various “middle spans” and “end caps”, which then combine together to make larger buildings. All of the half-circle “pockets” will be places where ladders and other vertical transitions can be slotted in.

Here’s the shape mockup I put together in Adobe Illustrator a few weeks ago, before the ZoomFinity idea had occurred to me. The eventual board you’ll see below uses this exact layout because it has a nice flow, but the pieces can be recombined in lots of different ways to achieve different building layouts.

When I did decide to put together a board of flat terrain, all I had to do was to shrink the pieces from my Illustrator file down to half size, arrange them to fit together on a Letter-size sheet of paper, and dump them out to a PDF.
If you want to print out your own set of modular terrain, you can download my PDF here:

My printer has an added feature where it randomly applies abstract art to anything I print out on cardstock. 😛
For these templates, you’ll want to cut them out in the same way I outline in my Transferring Templates Onto Foamcore infographic, except that you’ll be tracing onto foam (or paper) instead of foamcore at the end. The important bit is to add the corner cutouts on the interior sections so that you can easily transfer those parts onto foam.

I traced the above templates onto some sheets of coloured craft foam. To build my initial set, I made:
- 4x Circle-Straight
- 4x Circle-Bend (these have a direction– when attaching the tops, make two “left” and two “right”)
- 1x Circle Cap
- 7x Middle
- 9x Cap
- 3x Bend
- 2x Single Column
- 7x Double Column
However, cutting out 1-2 more of some of the smaller pieces will dramatically increase your ability to build different layouts.

I cut out the purple shapes, dropping them onto my board as I went.

Next, I traced out just the top parts. These are mostly regular rectangular shapes, so you can just measure them out with a ruler instead of tracing them all:
- Middle – Each has a 2″ x 1″ rectangle on one side, and a 1″ x 1/2″ rectangle on the other side (with a gap between them to let models walk through)
- Caps – Each angled cap shape is a 1″ x 1/2″ rectangle with the sides clipped at an angle. You can easily just leave these as rectangles though, the angle is purely aesthetic. 🙂
The bends and columns require curvy cuts, so you’ll need to trace those.

I hot-glued the brown top bits to the purple bottom bits, and we were good to go.
Looking back now, I think I should have picked a different colour than brown– it’s too close in value to the purple, which makes it slightly harder to tell them apart on the camera than it should be. When doing your own boards, I recommend doing one of the layers in black or another very dark colour, and the other layer in a brighter colour.

Two notes:
1) I stuck each foam piece down with a small tape loop to stop everything from sliding around.
2) I spraypainted the deployment edges with a red stripe and a blue stripe (respectively) to help players keep track of the direction of play.
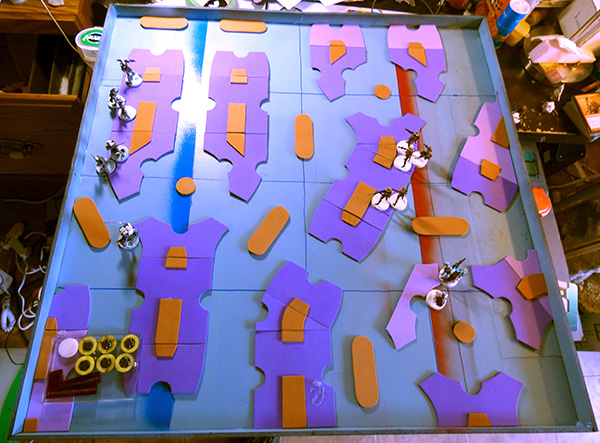
Aaaaaaand… we have a playable board! Hot damn! 😀

This is about where I was when I played my first full game, which I thought went super well. 😀
Thing #5: Optional Accessories
That title is immediately a lie, because the first one isn’t optional. 😛
5A: Tiny Templates

If you want to play half-scale Infinity, you will need adorable half-scale templates. Just go to CB’s Downloads Page, and under the “Tools” section, grab yourself a Markers PDF. When printing the PDF, set the scaling to 50%. You can directly use the paper templates you printed out, or use those to trace the same shapes onto colourful craft foam for a more durable and nicer-looking template.
5B: Building Labels
One that IS optional is building labels. The only major obstacle we ran into in our first game was that it was occasionally difficult for the remote player to indicate where he wanted his models to go; sometimes it’s hard to tell which building “the middle one” is supposed to be.
To fix that, I divided a sheet of white craft foam into 2″ x 2.5″ rectangles, and drew a big block letter into each space, then cut them all out with scissors and a sharp knife. These labels can be laid over all of your buildings to give the remote player something tangible to refer to– “move the Su-Jian down the West side of building F, toward the bottom ladder on building D.” Easy-peasy, pretty much instantly solved our communication issues. 😀
(Oh, and don’t glue these down– you’ll want to be able to put them in different places for different terrain layouts.)
5C: Order Markers
Disclaimer: The last major accessory I built was complete overkill. I just thought it would be fun to make, but there is a WAY simpler way to solve this particular problem, which I’ll cover first.
A very minor issue that came up in our first Zoom game was that it was occasionally hard to communicate to the remote player how many orders I had available and how many had been spent. Like most players, I track my orders with little round discs, starting them in one pile and then moving them to another pile as I spend them. This isn’t easy for the remote player to follow, so it helps to switch to an order-tracking system that’s easier to see from overhead.

The smart way to solve this problem is just to cut out some 2″ rectangles from craft foam or construction paper, and spray-paint one side black or white. I made this set in like… 3 minutes. Lay them out in a grid on the side of the board, and then turn them upside-down as you spend them. Really fast to make, and super easy to see from overhead.
That wasn’t how I decided to do it, though. 😛
5C-ii: Ridiculous Order Tracker

I cut out some craft foam strips in two cool colours and two warm colours, as well as two white strips for Lieutenant orders. These are 2.5″ long and 0.5″ wide.

I ran a thin bead of glue about 40% along each strip, then wrapped the strip around a kebab skewer and pressed the two sides together. Note that I wasn’t trying to glue the flag TO the skewer; I wrap, squeeze together, wiggle back and forth a few times, and then pull the flag off.

An hour (and one extremely goo-covered skewer) later, I have 42 little order flags.

Once those were done, I assembled my Order Kebabs. The top section (Combat Group 1) has a Lieutenant flag, and then ten order flags in alternating colours. I then added a foamcore spacer, followed by ten more orders (Combat Group 2).

Repeat for the other team, and then cap both ends with foamcore.

And then, build it all into a little tray. End result: dice rolling tray in the middle, flippy flags on the sides (I also painted the backsides black later; you can see it in some of the photos below). It’s very easy to spot the position of each flag from overhead, and it’s clear enough to the remote player than he was able to correct me a few times when I forgot to mark a spent order. 🙂
Again, though: don’t do this. Just make coloured squares. They will 100% do the job, and will take three minutes to make instead of three hours. >_<
End Of Things
And that, beloved readers, is all you need to play Infinity over web conferencing software. ^_^
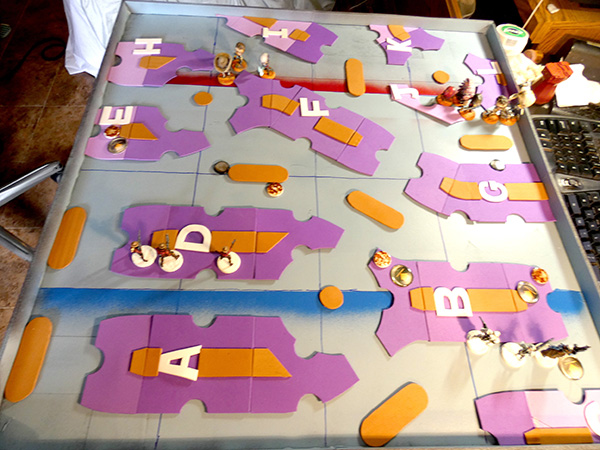
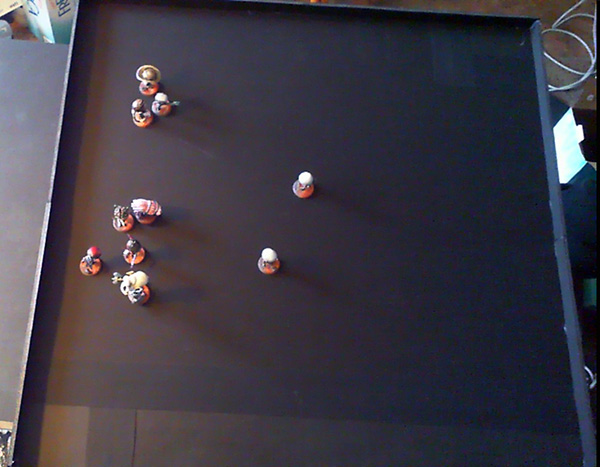
This is a game in progress, taken on a normal camera (not a screenshot from the webcam). It’s from the first full-scale game I played, which took about 90 minutes. So, once you get used to the format, it isn’t really much slower than playing in person. 🙂

Playing this way allowed both myself and my opponent to play our recently-finished Brand New Armies– me on my bobbleheaded Foreign Company, and him on a proxied version of his new Caledonians.

I got completely stomped. >_< This one Grey in a Mormaer Haris AROed literally 175pts of my clumped models apart in one turn, and still didn’t die.
Did you know that Massacre has smoke grenades?
Because I didn’t.
Whoops. ;_;

Grievous play errors aside, I am having an absolute blast playing ZoomFinity, and heartily recommend it to anyone with the necessary hardware and the time and attention span to assemble a board. It is far less excruciating than trying to fudge your way through a game on TableTop Simulator (sorry TTS community, but playing wargames on that awkward platform makes me want to claw my eyes out >_< ), and has the interesting quality that almost 100% of the work to set this up is loaded onto one player, while the remote players need to invest almost nothing.
That may sound like a downside to a lot of people, but it’s a huge plus in my book because it means that if you want to try this, you can do all of the prep yourself, and then entice opponents with the honest sales pitch that they don’t need anything to start playing except dice, an open mind, and two free hours on a weeknight. 🙂
Alrighty, that’s it for now. If anyone else feels the urge to build their own ZoomFinity board, I’d love to see what you put together, so send me pictures. 😀 If there’s enough interest, I could probably even be convinced to make templates for other (probably simpler) terrain sets, like a simple building pack and maybe a forests-and-walls pack. We’ll see how it goes. ^_^
Keep the pew-pews alive any way you can, and most importantly:

THank you Spud for all the hard work documenting and showing us your hard work. I always look forward to your updates. Hope you are doing well.