
Last year, Corvus Belli released some models that were, shall we say, controversial.

Obvious comparisons were immediately drawn, and the community split into camps: those who liked, or at least didn’t mind, the mild silliness on display, and those who were disgusted by the fourth wall breach that they claimed it represented.
I counted myself among the offended. Not because I objected to an oblique reference to a children’s brand, but because the cowards at CB failed to take this joke far enough. Because you see, while any run-of-the-mill joke may be funny once or twice, the most powerful humour can only be found when a joke is plastered onto the side of a blimp, blasted with floodlights, and then run straight into the ground, rammed through the surface, and pushed further and further until it breaks clear out the other side.
Subtlety, my children, is for chumps.

Let the blimp-ramming begin.
Ash and Misty are supposed to be 10 years old, and Google tells me that the average height of a 10-year-old is 4’10”. My standard skeletal diagrams (stolen, as always, from Patrick Keith) weren’t going to help here, so I set about customizing one for this project.

The diagram at right isn’t only shorter– it’s also had its proportions adjusted to match a 10-year-old child, with a proportionally larger head and shorter legs.

I generally use 20ga aluminum wire for my armatures, but given the smaller scale of these minis, I opted to wire them from slightly thinner and softer 22ga brass wire. Each armature has two pieces– a central column from the feet, up through the spine, and ending at the head; and a second piece for the arms, with a small tab in the center to help join the two parts together.
The Boy

The two halves were initially stuck together with super glue, and then a thin sheath of Green Stuff putty was wrapped around the joint to keep it from moving.
Once the armature was in a satisfactory pose, I drilled two holes in a champagne cork and dropped the protruding toe wires down into it.

All of my scratch sculpting is done with Fimo, an oven-baked polymer clay with (more or less) unlimited working time. However, Fimo doesn’t stick well to metal, so a thin shell of Green Stuff always has to be placed between the armature and clay. This base layer is always kept as thin as possible.

While the green stuff is still fresh, thin scraps of clay are placed around it and then squished down with metal sculpting tools.

Special care must always be taken here to push the clay and putty inward as far as the eventual model will require, most notably around thin joint areas like the elbows, knees, and under the arms. Once the putty cures, your “innermost depth” essentially becomes locked in, so it’s important to make room right off the bat for whatever crevices and shallows you will eventually need.

Alrighty, that about does it for the Fimo Sculpting 101 lesson that begins every sculpting post I make; from here out let’s focus on the specifics of this actual project.
Ordinarily I would take some time here to rough out the musculature for the figure’s body, but little kids, particularly in animé, don’t really have much in the way of bulges needing to be sculpted; their arms and legs are essentially featureless tubes. So in a break from my normal procedure, Ash’s first layer of clay went straight to his clothing– setting up the basic shapes for his super-stylish slacks-and-bowling-shirt look.
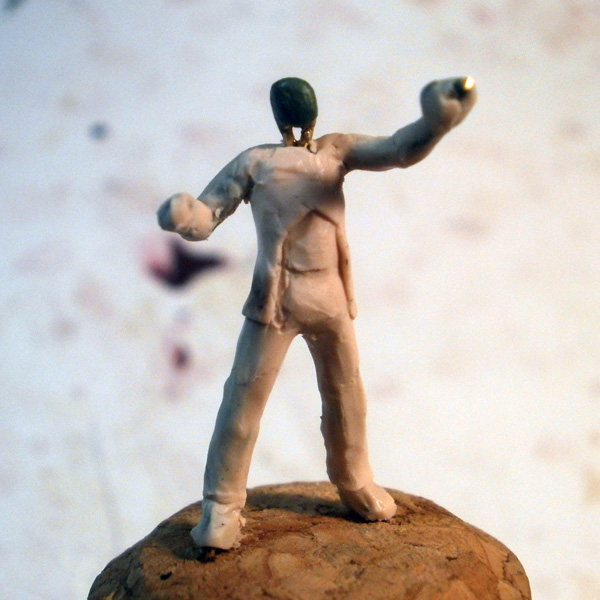
While I certainly wanted the models to evoke their animé expys, my intention wasn’t to completely reproduce their clothing from the show. Instead, I was going to put each model in the character’s general type and silhouette of clothing, but with details lifted directly from the original Kaeltar models. Here you can see how I’ve modified Ash’s shirt to match the partial open front of the Kaeltar’s jackets:

I placed the “window” a bit lower down, but made an effort to preserve the same general shape– and would later go back and reproduce the same plates underneath to complete the look.
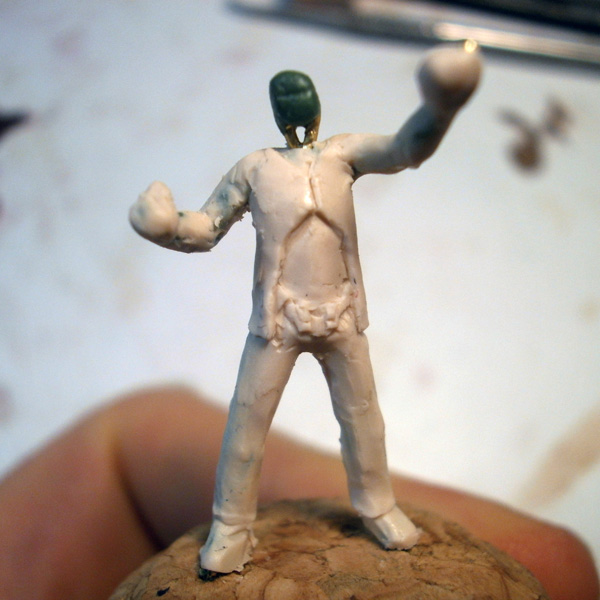
I normally sculpt models starting from the feet and then move up the body to finish with the head, but for whatever reason, this time around I decided to jump all over the place and add details in random order. The belt was the first item that received detailing, and was directly copied from the original model; tiny clay specks were laid on in a V pattern, and were then shaped into the required panels and bits using Clayshapers.

I next jumped to the head. I had briefly considered just using one of the original metal heads that came with the models, but ultimately decided that I was better off recreating them since both of my figures would feature alterations from the basic design (one having a baseball cap over it, and the other having asymmetrical horns), and it would be a pain in the ass to make the desired alterations on top of a metal head.
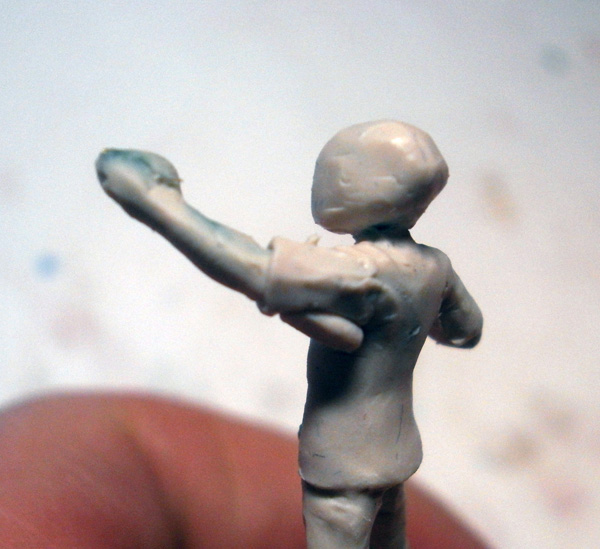
I added clay to the back of the head to start working toward its eventual oblong shape.
Also pictured: adding some clay under the arm to create the somewhat baggy sleeves of the bowling shirt.

I started working in the rough details with metal tools– the deepest parts of the eyes, followed by the slightly shallower pockets around them, with a big nose plate in the center.

I then went in with a clayshaper and started cleaning things up and adding mass for additional shapes like the chin tubing. The eyes were still a bit too small, but they were one of many things that would see cleanup later on.

I didn’t bother adding much detail to the top of the helmet since it would be almost entirely covered with Ash’s trademark baseball cap, which I started applying clay for at this point.

Any sort of hat brim is always a huge pain in the ass to sculpt, because it’s a thin component hanging loose with no support. Fortunately, Ash’s cap has a fairly small brim, so I was able to keep it more or less steady by sculpting it fat at the base and then tapering it out toward the brim.
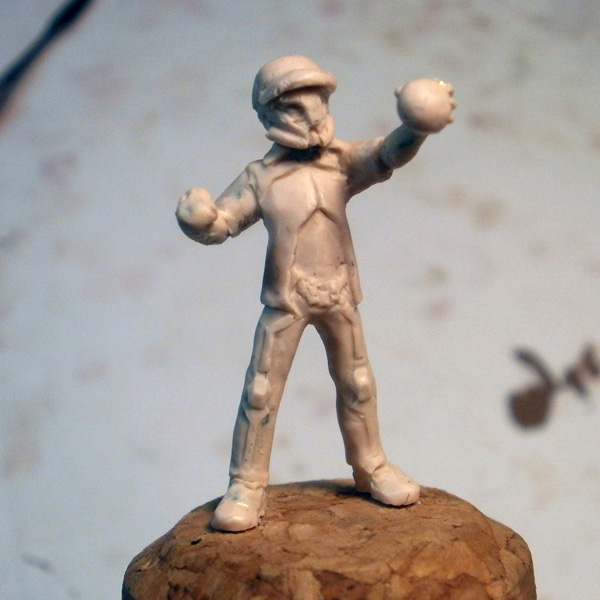
By this point I had also branched out and started poking at the other areas of his outfit, adding in the collar, setting up the general shape for the shoes, and roughing in some of the detail for the pants and shirt.

I wired the arm to be slightly long so that the outstretched pokéball could be built right onto the skeleton. The fingers around it were sculpted by rolling out extremely thin clay snakes, cutting them into very short segments, and then lifting them into position around the ball. I took better photos of this process for the second figure, so we’ll look at it in more detail then.

More random details!
The Kaeltar’s jacket has a circular indent on the back, which I faithfully reproduced on the bowling shirt. You can also vaguely see here where I added a bit more detail to the chin tubing and the top of the hat– unfortunately I didn’t get a direct shot of these, but you can see them in better detail later.
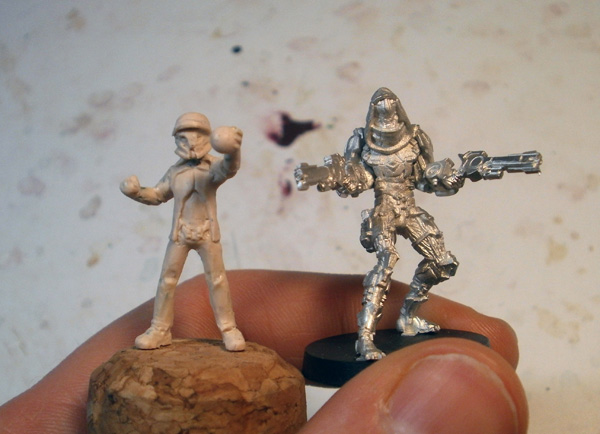
At this point things were shaping up pretty nicely. You can see here the model’s reduced scale next to a standard Tohaa model– even with that figure in a slight crouch, little Ash barely comes up to his shoulder.

At this point I had mostly only done construction of large bulky shapes, but my intent had always been to reproduce the surface detail of the actual Kaeltar models on Ash and Misty’s clothes to help them fit in with their fellow Tohaa. I wouldn’t be copying them precisely, however– the actual models have very clear layered plates, and I wanted to maintain the impression of my models simply wearing clothes. So anywhere the real models had a bulky plate or strap, I added a cloth seam in low relief.
The kneepads were the only piece that I let stand out; everything else was set up to be a piece of flat detailing, to give the impression of layers of cloth stitched together.

Some details, however, were simply fabricated– the real models had a single strap on the side of the thighs, which I duplicated a few times to fill in the rest of the upper pant leg.

I then moved down to the bottom and finished where I usually start most models– with the shoes, which I reproduced almost exactly from the original models, modifying them only to take the form of sneakers instead of ankle boots.

Lots of details and cleanup going on all over the place. Pokéball had the equatorial relief added, and the right hand received its fingers.

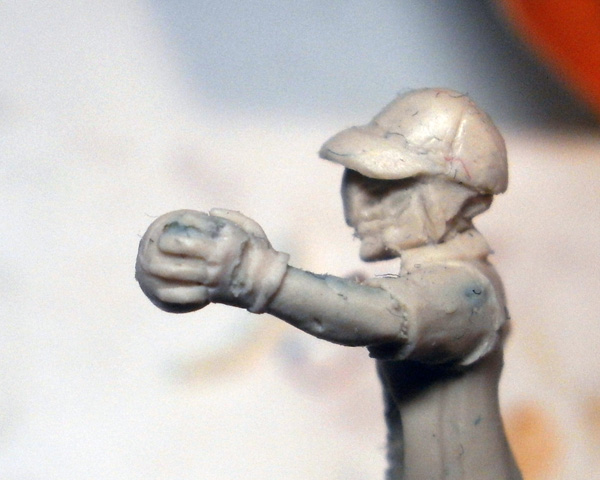
Ash actually almost made it to the oven for baking before I remembered that he was supposed to have fingerless gloves. Fortunately I caught it in time– here you can see where I’ve laid clay snakes around where they’ll end at the wrists.

Another clay snake went around the fingers, and then both were smoothed into the hand.
Grooves were cut between the fingers, and an opening was made on the back of the hand.
Obviously still needed a bit of cleanup at this point. 😛

Ash almost made it to the oven AGAIN before I remembered that I hadn’t finished building his hat, which was too round compared to the actual character’s fairly angular cap. I added more material in a ring around the top and then began working it into the existing hat shape.

All smooshing is done initially with metal tools and then smoothed with clayshapers.

Once the silhouette was correct, I re-added the groove line thing, and Ash was pretty much done. He still needed some smoothing (they *always* need a ton of smoothing after the interesting parts are over), though, which I did gradually as I was working on the next model. You can see how he turned out about 25 pictures down.
The Girl

Misty followed essentially the same process as Ash, though her outfit would be quite different. It is a well-known medical fact that women’s bodies maintain a scalding 130 degree celsius internal temperature, requiring them to leave huge tracts of skin exposed for cooling purposes.This is why Misty continually runs around in a tank top and booty shorts in weather that her friends find to be more appropriate for long pants. Were she to steal a pair of Brock’s slacks for more than a few minutes, they would all be consumed in a violent fireball.
That’s just science, you guys.


Misty’s armature was rigged up according to the same proportions as Ash’s. While I normally differentiate male and female skeletons, human gender dimorphism doesn’t really set in that much until post-puberty*, so I didn’t mind just giving them both generic “kid skeletons”.
* I think? It’s hard to find good anatomy reference for kids without risking having some really sketchy stuff in my search history. @_@

As before, a layer of Green Stuff is wrapped around the skeleton, and then a layer of Fimo is pressed down into the wet putty.

Unlike Ash, Misty has a lot of exposed skin (and what clothes she wears are much more skin-tight than his baggy outfit), so I took the time to actually model out her musculature. I’ve never sculpted a kid before, so I carefully selected some relatively harmless photo references (mostly of young gymnasts) and modeled her against them. The main differences from sculpting an adult woman being, somewhat obviously, that she has dramatically fewer “bumps”. Less bulgy hips, relatively flat butt, and so on.

Limbs, on the other hand, were modeled more after the animé reference than on the life models– the 10-year-olds in my photos (good god there just isn’t any good way to say that… @_@ ) had fairly curvy arms and legs, but Misty is canonically drawn with featureless tubes coming out of her torso. Modeling her with more realistic muscle and fat content would end up giving her an undesired apparent plumpness compared to her source material, so I erred on the side of the tube limbs.
This, you’ll notice, is NOT what is pictured here, as my sculpting autopilot led me to give her developed calves and shoulders. I had to go back and clean these up later.
Sigh… it’s hard to shake habits. :/

And then I had to sculpt her boobs.
Which my reference said she probably shouldn’t have, but which Misty canonically has.
Because of course she does. :/

With all of that awkwardness behind us, let’s start modeling her beachwear clothes!
Skintight clothes are much easier to sculpt than baggy ones, as you don’t actually have to apply clay for the vast majority of the garment– instead, you just apply tiny clay snakes around the edges (as we previously covered for Ash’s gloves); the interior side gets blended down against the skin, while the exterior edge gets hardened with the edge of a clayshaper.

As I had done with Ash, I moved straight from the rough outlines of Misty’s clothes to her helmet. In her case it was a more rational decision– I wanted to maintain her skinny build, which required me to leave at least a bit of space for a visible neck. Knowing where the bottom of the helmet fell would help me ensure that this gap was never accidentally filled in as I worked on the surrounding areas.

The eye was a bit small, so I widened it a bit.

Ash’s helmet was mostly obscured by his hat, but Misty’s would be fully exposed, so I had quite a bit more work to do here to mimic its shape and details. I started by sculpting a fairly generic egg shape for the back, but after looking at the heads that shipped with the models, I realized that it was a much more complex shape, with a main “frond” on the top and several layered panels underneath. I started working as much of that into the helmet as I could.

Even the front was more complex than what I had needed to sculpt for Ash, with the large plate on the top of the head flaring off into several small “tips” along the eye ridge and the top of the head.

I had a lot of fun sculpting these. I like layered armour plates. 🙂

More detailing on the back of the head. The thick top and side plate gives way to a small pocket on the back that will soon contain several thin, overlapping “leaves”.

More smoothing and details on the eye ridge. I also started blocking out the vague shapes of the chin tubing.
(Sorry for the thin commentary– I just don’t have a lot to say here other than “See that? I added that!” :/ )

Here I worked in the aforementioned overlapping leaves

The helmet still needed quite a bit of smoothing and detailing at this point, but that was enough for now, so I moved back down to her clothes.
As I had done with Ash, I wanted to mimic the shapes of the Kaeltar’s body armor as bas relief panels, while staying within the contours of Misty’s shorts and tank top. Here you can see the same “chest window showing ab plates” design that Ash received, albeit at an even lower level of relief to accommodate her tighter garment.

Shoes!
Details on shoes!
Also details on shorts!
Also details on shirt!

Also details on… actually I don’t know what this photo is of.

Anyway, let’s give her a pokéball! This procedure is pretty much the same as we did with Ash– connect the ball directly to her skeleton, and then sculpt a hand around it.

I promised earlier that we’d take a look at the process for the fingers, which are made from chopped-up clay snakes. Here they are depicted on my vinyl desk mat surrounded by about a month of tea stains.
I… er… need to wipe it. ~_~

The bits of clay are lifted onto the model and pressed into place. Clayshapers are used to blend them together into a proper hand.

The thumb is thicker than the rest, so it gets built from several snakes all mashed together.

Initial hand smoothing can be seen here. As with everything, more smoothing and shape correction will occur off-screen.
I rolled out way more clay snakes than the hands required, so I went ahead and applied the remainder to her torso to form her suspenders. Nothing terribly complex here– lay on the round snakes, and then use clayshapers to flatten them and sharpen their edges.

Still more straightening required, but you get the idea.

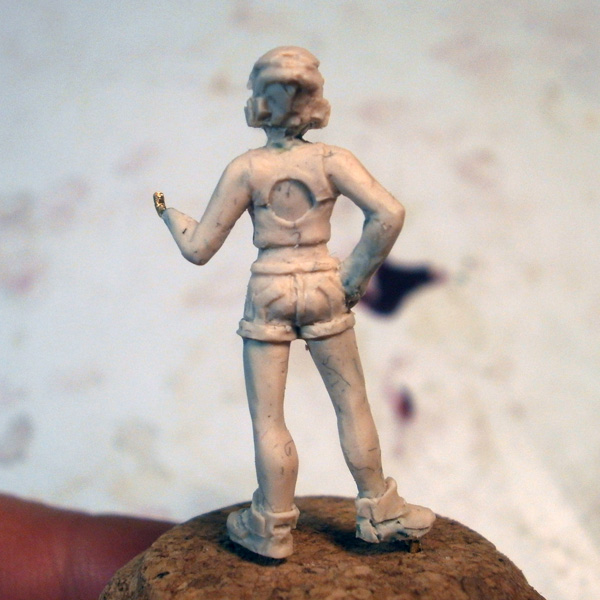
I could not find a single reference photo of Misty’s suspenders from the back, so I just made them look like every other pair of suspenders in the world.
If it turns out that she has some bizarre strap configuration in the back, I blame 4Kids for never showing it.

A bit more smoothing on the suspenders, and then I added the triangular clips that hold onto her shorts.

Alrighty, full disclosure: I screwed up her right hand pretty badly. There was too much wire in place, and rather than simply clip it down, I decided to “work around” the excess wire and just build the hand higher.

This was a horrible mistake. She ended up with a beefy caveman hand that I could never manage to work into a believable pose.
And I never fixed it.
So she just has that hand now.
Sigh.
Lazy Spud makes the worst decisions. ;_;


Misty was approaching completion; the only major detail to add was an armature for her single asymmetrical horn, which was meant to be a stand-in for her asymmetrical pigtail. Just before the model went into the oven, I twisted a small hook into the end of a wire and embedded it into the side of her head.

The embedding was far too soft to withstand any twisting, so I didn’t bother shaping it at this stage– that would have to wait until she was baked.

Oh, and she has a teensy horn on the other side, to mimic the disheveled right side of her hair.
So, yeah. I did a ton of additional smoothing, and then Misty dove into the halogen oven.

Now that the wire was solidly embedded in her skull, I twisted it into the desired shape and then clipped it to length. The end was clipped at an angle to let me taper the putty and clay around it to a point.

Putty went over the wire, and then a little “wing” of clay went around it.

I then did my best to give this the same general look as the original models’ antlers– hard geometric lines with swoopy curves engraved on the surface.
One more quick trip through the oven, and the duo were complete. 🙂

Gotta admit, I’m pretty pleased with them even despite all of their flaws. 🙂
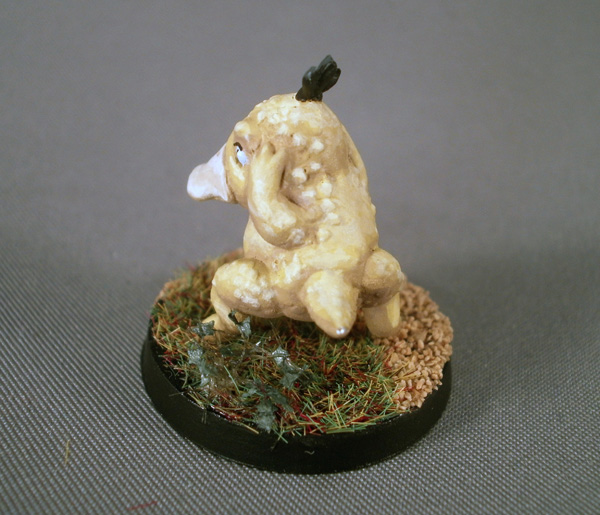
Up next: the critters. 🙂
Great job! And we have a good laugh on the local infinity channel 🙂
Symbiobeasts as big dragons next? ^^
Love it!
Also found a reference for Misty’s back: http://41.media.tumblr.com/tumblr_m6gfjeuqAC1rxbm65o1_500.png
Hilarious AND amazing! 😀 I love how you manage to make a couple of “joke” characters, and even so they’ve got a pretty compelling aesthetic to them, taken straight.