
Updates have been a bit sparse lately due to my holiday giftmaking– most of my projects are super secret until delivery to their various recipients, and work on the remaining presents robs me of the time I’d need to blog about them anyway.
But fear not, seven remaining readers! For while Spud cannot show you something worth looking at, he CAN waste your time with an incomplete practice mini and a goofy piece of recently-acquired photographic equipment!
The Enmeggening
Two years ago, Meg Maples ran one of her painting classes about an hour away from me in Toronto. However, this turned out to be really awful timing, as the college where I work was on strike at the same time, and as such, I lacked the disposable funds to attend. Sad Spud. ;_;
Time passed, Spud continued to pout over missed opportunities (as Spuds do). This past summer, however, I learned two important pieces of information:
- Meg would be moving to Australia, removing any possibility of a second Toronto class. BOOOOO! 🙁
- Before leaving, her very last class would be held in Montreal, where a bunch of my family live. YAAAAAAY!
Not willing to let my last opportunity at painting improvement slip away, I booked a plane ticket and stepped out on what would turn out to be an Epic French Canadian Painting Adventure™.

Meg’s class is broken up into two days of instruction; day one is lots of practice to learn two basic techniques (two-brush blending and glazing), and then day two focuses on using variations on those techniques to paint various textures– cloth, skin, hair, metal, and so on.
The mini I chose to work on all weekend was a random piece of metal I fished out of my bin of Reaper minis (I have a tendency to go “OOH SHINY” when I’m browsing Reaper’s catalogue and then lacking any time to do anything with them after making my purchases, which results in a lot of silver minis piling up and taunting me with their nakedness). I had absolutely no plans to ever use it and didn’t care if it got wrecked– Mr Floaty Wizard Guy up there was simply a vessel through which painting lessons would be funneled into my brain.

Our first task was to try two-brush blending; I figured it would be easiest to try this on a large flat area of the mini, so I chose to take my first stab at it on his flowing skirt.
The skirt was basecoated in orange, and then I mixed up shade tones by adding increasing amounts of blue. I’ve tried two-brush blending before with the aid of chemical additives (I’m a big fan of Vallejo Glaze Medium, as I’ve mentioned before), but Meg’s technique uses nothing but slightly-watered-down paint and quick reflexes. It was definitely a challenge to get used to– I was working without a wet palette for the first time in years (since this apparently over-dilutes the paint), and my fingers don’t normally move with the speed that’s required to swish the paint around before it’s dry.
I blame sculpting for this– I had to train myself over the years to move very slowly and deliberately to avoid hurting my putty and clay, and it’s hard to convince my nervous system to operate in any other way. >_<
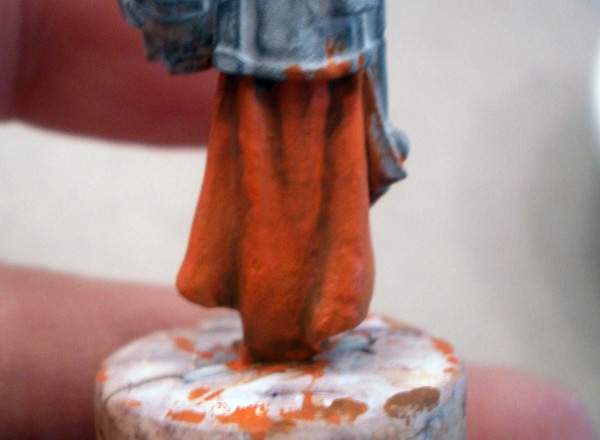
This was also notably my first time painting a mini entirely using P3 paint. I’ve traditionally been a Citadel painter since the start of my painting career, purely because I know the names of the paints and didn’t feel like re-learning a whole new range. However, Meg was pretty adamant that Citadel paints simply don’t have the right consistency to blend, and her warnings bore out over the course of the first day, as the three people who showed up with Citadel paint had no end of problems trying to get the technique to work.
I started the weekend with six P3 paint pots “just to try the technique out” (picking up red/blue/yellow/black/white to let me mix whatever colours I needed, and a pot of silver to do my metals); by the time I left for home, I had purchased another dozen.
So, yeah. I guess I’m a P3 guy now. :/
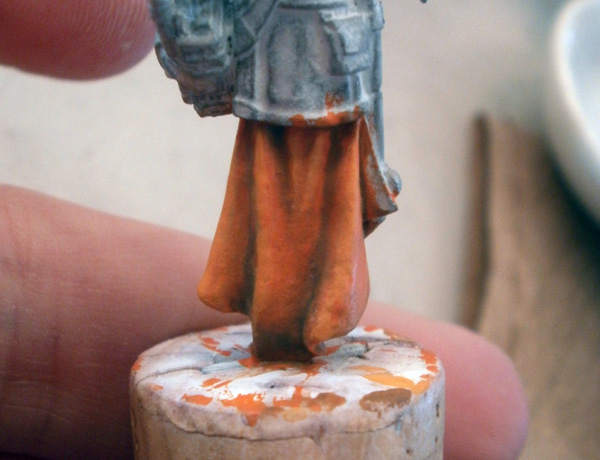
Once I’d done the two shade layers, I started on the highlights by mixing yellow into the original orange base colour. Meg said repeatedly that most people find shading much easier than highlighting, but I found the opposite to be true on my first attempt– the highlights went on quite nicely, while the sheer size of the shaded areas made it hard to get smooth coverage in the creases.
As it turns out, this was all due to the size of the folds on the skirt, which gave me plenty of room for highlighting; on all of the later stages of the model I was working on much smaller and more detailed sculpting, and found that it was, indeed, quite difficult to get the highlights to stay in place without falling into the adjacent valleys.
But that was later. For now, I was finding it pretty easy. 🙂

Here’s the finished skirt, with two shade layers and two highlight layers. I thought it looked pretty badass. 😀

Probably the most difficult thing throughout the process for me was simply keeping my paints from drying up. As I said, I’ve been using a wet palette for ages, but Meg prescribed a dry well palette for her class, and the adjustment was really hard (KINDA LIKE MY PAINT, HAHA GET IT?). She showed me a couple ways that I could mitigate this problem– first of all, my giant ceramic palette wasn’t helping, as the smaller wells on a cheap plastic palette ensure that less of the mixed paint puddle is exposed to the air. Once I switched to a crappy plastic palette generously donated by my neighbor, it went much better.
The other adjustment that helped a lot was getting myself used to mixing more paint at once. Using a wet palette has gotten me used to mixing very small quantities of paint, as nearly none of it will be wasted due to drying out. However, when working with a dry palette, I found that it was in my interest to mix a vastly larger paint puddle (easily ten times the volume I would ordinarily mix up), as this ensured that the puddle had some depth and took much longer to harden.
Sigh… change is hard. ;_;

Happy with the orange skirt, I moved onto the robes, which I decided would be a sort of light blue to contrast. Here I’ve applied the basecoat, which came out really shiny for some reason. >_<

Fast forwarding a bit, here’s the finished robe with the same two shades and two highlights. The orange and blue actually ended up being each other’s shade colours– I mixed teal into the orange shades, and orange into the teal shades.
This is where the “highlighting is more difficult” lesson hit home for me– the small size of the details I was working on made it really challenging to keep paint where I wanted it, which resulted in much messier shading than I had managed down below. I was feeling very confident at the end of the orange skirt, but my hubris was tamed by the end of the blue parts. It was obvious that I’d need to put in a ton of practice before I could really get the hang of two-brush blending. :/

Nearly everything Meg taught us during the weekend went counter to the sloppy self-taught painting style I’ve developed over the years, but I was happy to note that the technique she was recommending for eyes was nearly the exact same one I’ve been using. When you spend an entire weekend having your ego shattered, it’s nice to have at least one brief reassurance that you haven’t been stumbling around in a complete blind stupor. 🙂
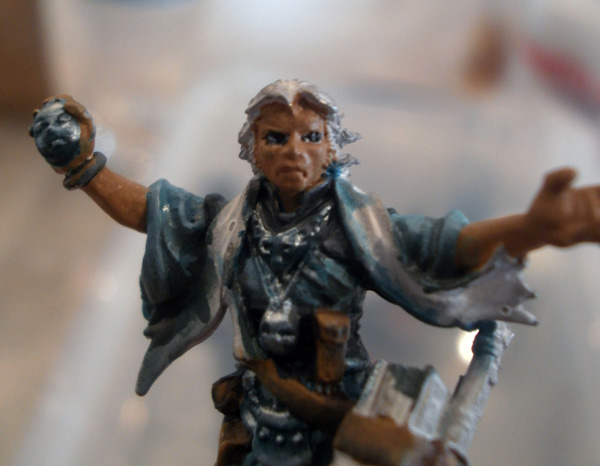
That technique, incidentally, is “black eyes, then white, then black dot, then coloured iris, then black pupil, then white light spot”.

I honestly can’t tell if this is a finished picture of the eyes or not. My camera wasn’t focusing well. >_<
Random note while we’re on this photo: Meg showed us a great technique for doing metal, which is probably the most valuable thing I got from the entire weekend. I’ve managed over my years of painting to figure out a “sort of okay” technique for most materials, but my metals have always been simply awful. I’ve flat-out ruined promising paintjobs with horrible metals, so it was a huge relief to absorb a much better technique, which I’ll be using from here on out.
However, while the technique was a massive help in theory, this specific mini ended up being a fairly bad implementation of it, simply because the bluish metal colour I whipped up ended up being exactly the same colour as the cloth underneath it, making it extremely challenging to see. D’oh. >_<
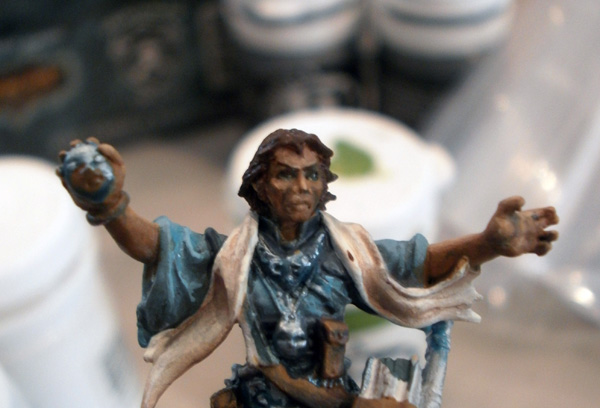
After eyes, the next thing Meg covered was skin. I wanted this guy to have a darker skintone, so I basecoated him with a medium brown and then mixed blues into it to shade. Highlights went toward off-white. I think it came out quite nice. 🙂

Hair was the second most-useful technique of the weekend for me. I’ve managed some passably okay hair in the past, but it’s definitely suffered from the problem she described to us– you highlight individual sculpted hairs, and that’s exactly what it looks like: a dozen highlighted parallel bumps. Meg’s technique uses glazing to give a more general colour transition that doesn’t manually highlight any particular hair lump, instead letting layers of very thin shades and highlights create a more gradual shine.
This guy’s hair doesn’t show it off very well since I went for a fairly dark colour, but I’m really looking forward to trying the technique out on a lighter-haired mini sometime soon. 🙂

In between the major topics of the weekend, I plugged away to fill in random details on the model. I wasn’t trying to make that nice of a mini overall– I was just finding opportunities to practice the techniques she’d shown us in different colours and on differently-shaped objects. I whipped up brown leather straps, a red book (and red Pope shoes), an off-white shawl, and eventually, some goldish wands and jewellery. These were my second attempt at metals, and they worked out much better than the previous blue metals since you can actually, yaknow, see them. 😛
And that’s pretty much where I left the model. There are a bunch of crystals and small cloth scraps that I never got around to painting, but the weekend came to a close and I didn’t care enough about this throwaway model to put any more time into finishing them up. Here’s how Mr Floaty Wizard Guy looked in his nearly-but-not-quite-complete state at the end of two days of feverish painting:
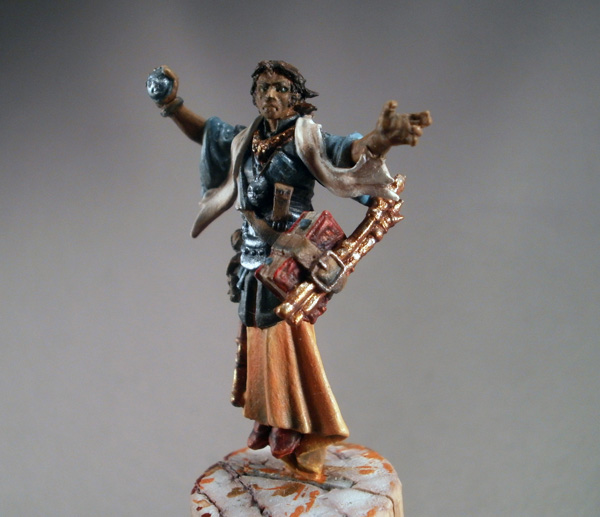
Does he look great? Nah. But he was a perfect learning exercise, and I’m looking forward to trying the techniques I learned while ruining him on other models that I actually care about.
Overall, I’d rate the value of Meg’s class as high as whatever scale we’re using goes– the techniques she’s demonstrating are really quite simple, but years of attempts on my part to understand other people’s descriptions of the same techniques based on photos, text descriptions, and poorly-shot YouTube videos left me entirely unable to replicate them. There really is nothing quite like actually watching a competent demonstration, and so I feel I absolutely got my money’s worth simply for an opportunity to watch Meg work.
I walk away from her class with two new general-purpose techniques and two specific corrections to things I used to absolutely suck at. More importantly, however, I left Montreal feeling like I actually wanted to go home and paint something else, which is a sort of motivation that’s become harder and harder to dredge up over the last few years. My discouragement over my “merely okay” results were seriously damaging my motivation to pick up a paintbrush; but with my two biggest challenges essentially cleared away, I don’t have to start every painting project already knowing it’ll suck at the end.
I don’t know if that infusion of excitement will last, but I’m hoping that I can stretch it out for at least a few more months before I fall back into my “WAAAAAH DON’T WANNA PAAAAAAIIIINT” funk. 😉
So, yeah. Kudos to Meg for running an amazing workshop. Thanks also to all of my classmates for asking fantastic questions and for being generally awesome, and particularly, thanks to Mr. Yaum for taking care of the thing with the guy in the place, wink wink, cough.
…
…yep, that’ll do it.
The Other Thing
So, hey. Didja see that video I posted up there? Didja notice how the mini was turning smoothly, giving an easy way for me to show you the entire model from all angles?
That’s my new toy.
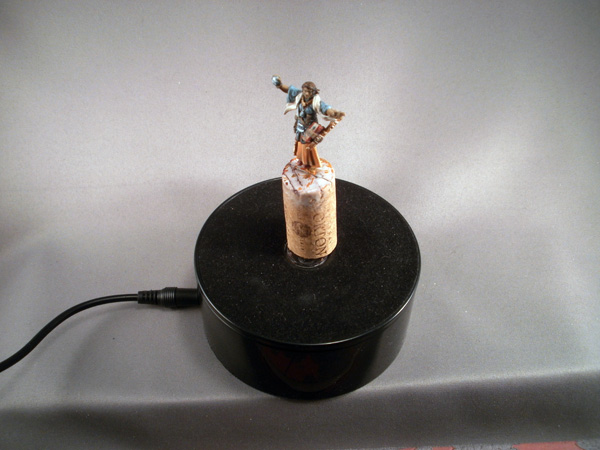
It’s a product display rotator thingie that I ordered from some random online store based in Hong Kong. It cost me $25, shipping included, and got here in like four days (FROM FREAKING CHINA! FOR FREE! THE FUTURE IS HERE, PEOPLE!), and I loves it with all my potatoey heart.

I’ve been shooting videos with it on my work Beep-Boop for a couple weeks now. Most of the videos are of things I can’t show you yet, but you’ll start to see these 360 videos of pretty much everything I post from here on out.
Seriously, I cannot endorse this product highly enough. If you are a person who posts minis on the interwebs, and you have access to even a moderately effective video camera, I can think of very few valid reasons not to own one of these things.
That’s it, that’s all I have to say about it. It’s really simple, it’s super cheap, and I expect every single one of you to buy one and start posting turnaround videos of your minis.
Go buy one now. You’ll have it by Wednesday.
I’m not kidding.
Go.
Thank me later.

Meg’s class is awesome. I’ve taken in twice now.
I’m very glad that you’re looking forward to painting, rather than dreading it. His skirt thing looks amazing, by the way. You killed it there.
How’s your Templecon army going?
No particular army prep this year– I’ve mostly been focused on Infinity terrain this year, so my January productivity blitz will be focused on finishing that so that I can haul it down for the Space Men events.
Other than that, I’m probably just lugging around a couple Thunderdome and Grind squads and camping the scenario tables. Definitely looking to have a lower-key TCon this year than the frantic chaos I’ve forced upon myself in the past. 🙂
Et vous? Will the Aquablight be done in time?
I’m hoping so. Time will tell, eh?