

Spud is a bad friend.
This past holiday season, I had a list of projects I wanted or needed to do in time for the holidays:
- My assigned secret santa present
- My voluntary secret santa tournament entry
- A present for Mr. Boots
- Presents for the three people I annoy on Cards & Board Games Tuesdays at my local store, who I determined to be the subset of my associates who contributed the most to my overall enjoyment of 2012.
The weird thing about me, though (well, one of the weird things) is that while I enjoy lavishing amazingness on my closest friends and family, I also expect those same people to put up with the most of my crap. As such, when I realized that I could not finish all six of the gifts I had committed to, the victims were not the ancillary presents for random jerks (JERKS!), but rather the gifts for the people I claim as my dependents when filing my taxes.
However, I did not intend to simply cancel these gifts; the people in question earned their rewards, and I simply needed more time to work on them. And thus was the stage set for each of my three victims to receive a tiny wrapped present during our holiday gathering, upon each of which was written:
“Do not open until Christmas In March.”
I had bought myself three months. One of them was spent prepping for Templecon, but once that was finished, I hunkered down and proceeded to spend the next 7 weeks huddled over my desk, poking feverishly at putty with sharp sticks. I technically missed the March 25th date for total completion, but I got each one up to a presentable stage so that the recipients could see where their gift was going. And now, with a few more weeks of work, I’m ready to start showing them to the merciless Interwebs.
First up is the gift for my student driver, Tom. Tom is without a doubt the person to whom I most owed a gift; he was on the list in 2010, but I couldn’t think of anything to make for him. He was again on the list in 2011, but coordinating Gday’s misery ate up all of my prep time that year. This year, I was committed to finally finishing something for him. My initial plan to make him a custom Circle warlock was complicated when he sold his Circle army in January ( ~_~ ), but I went back into the tank and tried to come up with something just as awesome, and after chatting with the e-mail chain, I had my concept.
Behold, the Gestalt Mammoth:

I think you’ll agree that once this hit paper, I had no choice but to make it real. The universe wills it.

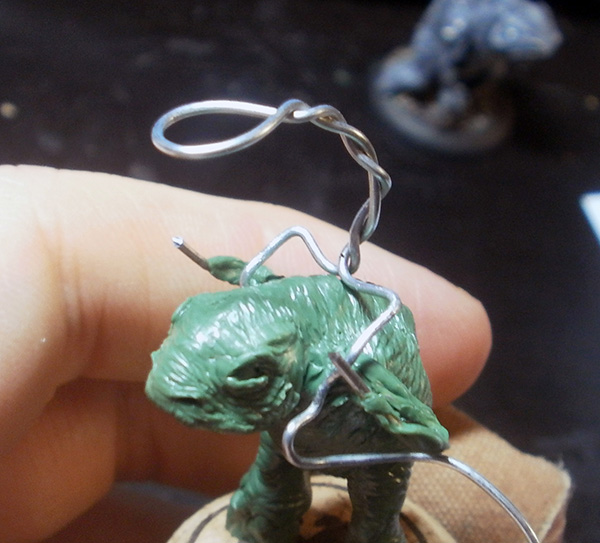
I wasn’t able to acquire an Agonizer model to examine in-person until midway through the production process, so when I started wiring it, I only had pictures to work from. To get the right size, I scaled an Agonizer against a random man-sized model, which I then scaled to 30mm total height. This gave me an Agonizer on paper at approximately 25mm high, which let me produce the rough skeleton at left– it turned out to be mostly accurate, though the oblique angle of the Agonizer photo caused me to end up with slightly narrower shoulders than a real Agonizer.

Once I had the skeleton laid out on paper, I reproduced it in wire. It was tough to figure out what to do with the head, since the Agonizer photo doesn’t have a side shot to show me how long to make the neck; I ended up making a guess.

I then wired it up on top of a cork, with the feet sitting up on top of small putty blocks– the bottom Titan would be standing on stilts, so I wanted to give myself room to make his toes droop down.
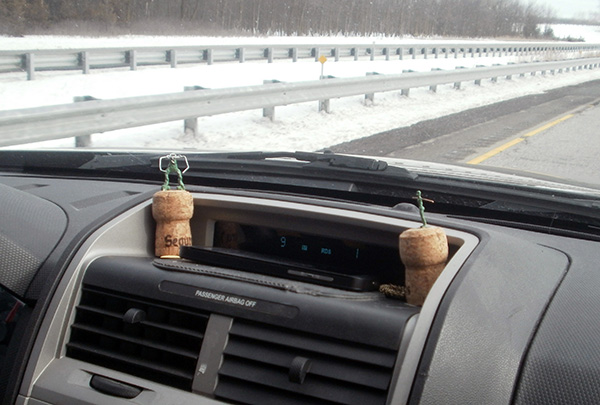
I then put some structural putty around the skeleton to firm everything up and left it to set. Everything up to this point was done while riding as a passenger on a recent road trip; it took much longer than normal because I’m used to bending skeletons on a hard, flat surface, and trying to do precision work while holding the model in the air is surprisingly difficult.

At this point I was able to secure a sample Agonizer to compare against; I was pretty happy with the overall scale of my skeleton, and ploughed on ahead.

As always, I started with the feet and moved upward. I applied putty blobs around the rough structure, then smoothed them together into roughly the shape Iw anted.

It took some experimentation to figure out how to do elephant skin. As it turns out, a decent method is to do two sets of intersecting “stripes”– one more or less horizontal, and then another one offset by about 20 degrees, following the contours of the body– essentially making ripples around the toenails, knees, hips, and so on.
For the first titan’s legs, I used an edged clayshaper to draw the lines, but I found that the result was overall too smooth; on all subsequent areas, I created the crease lines with a metal hoe tool.

It took me a few layers to get the body sufficiently bulked out– my brain was stuck on human anatomy, and didn’t want to put a body that round on top of legs that narrow.

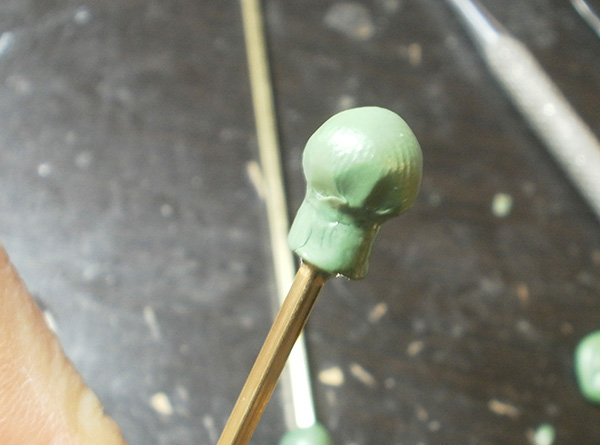
Here you can see the skin created with a metal tool– it’s rougher and has more detail in it, with less rounded forms around the grooves.
Also note that I’ve finished constructing the “skull”, and popped eyeballs into it. Once it’s set, the “face meat” will be added around it.

Like so!

As with the body, it took a few layers to get the putty applied– here he’s still a bit froggy-looking, and needed more mass added to his nose.

Skin is textured in the usual way, with the addition of bumpy lips and nostrils. Each of the titans was going to have a different facial expression to distinguish them; this one has several hundred pounds of baby elephant on his back, so I wanted to give him a “C’mon guys, stop squirming!” look of annoyance.

Here’s a blurry shot of the back (not sure why so many of the pics for this project came out shaky– apparently I need to start using my tripod more often), where you can see the bumpy spine I copied from the agonizer (though adult Titans aren’t usually depicted with one, so I’m not sure if this was supposed to be a feature of baby Titans or just half-starved Agonizers).

JAW PUTTY!
This was let to dry, and then I sculpted skin over it later.
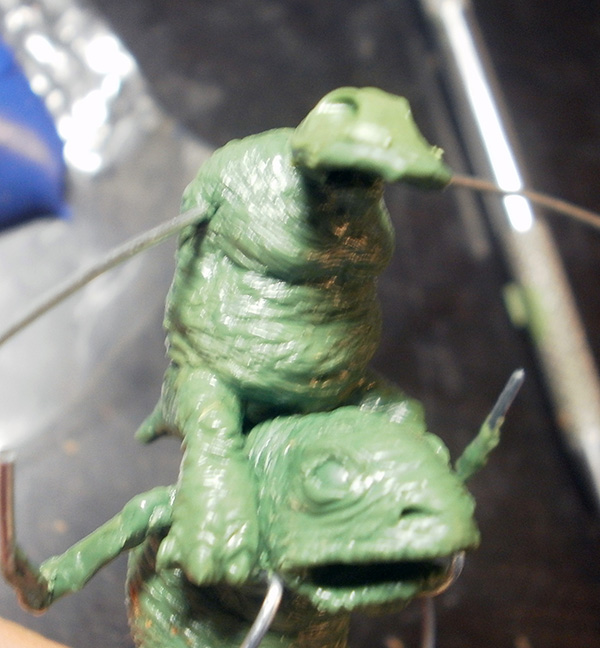
I still had work to do on the lowest titan, but with the torso mostly done I was able to wire up the middle body. I didn’t have anywhere I could secure it into the lower one, so I instead let the wire extend way past the toes, and then secured it into the cork.

I firmed the wire up with putty, and then added another piece roughly where the arms needed to go.

More structural putty to hold everything together. I was much more generous with the torso foundation this time; I was too hesitant to fatten the first one up, so he took too many layers to properly bulk out. This time I knew how heavy he would end up, so was able to establish more of that from the outset.

Once the foundation was set, I detailed the middle Titan in the same way as the first one– smooth putty into the shapes I wanted, followed by details.

Here you can see the bulked-out legs and the adorable little tail.

Details are added. The metal tools are definitely working out better than the soft rubber ones for this particular application, and they’re much faster to boot.

Still not fat enough. MOAR BLUBBER! MOOOOAAAR!
Blubber texture. The criss-crossing technique is becoming easier by now.

Here I’ve build the jawbone; the middle Titan is the melee fighter, so I wanted to build him with an aggressive “battle cry” facial expression.

Eyeballs are added, and I also attach his teensy middle arms. The top and bottom titans will be doing things with their tiny arms, but this one is just holding himself steady.

ANGRY ELEPHANT FACE

As before, I started wiring up the next one as soon as the lower figure’s torso was more or less finished. The top figure would be firing a slingshot, and instead of having him sitting straight like his downstairs neighbor, I decided to vary the pose a bit by having him straddle the poor guy diagonally.

You know the stages by now… STRUCTURAL PUTTY!

SKIN!

ADORABLE TAIL!
…etc etc.
Let’s skip ahead to something else…

The three baby titans are doing their best impression of a Mammoth, which requires them to get very high up on a pair of stilts, and then reach back down from that height to punch people. To build the stilts and punching sticks, I examined a few different materials, but ultimately settled on rectangular brass tube. I got two different widths– one about 1/4″ across and one about 1/8″– and here I’ve cut both of them into roughly 7″ sections, which I figured would put them at about the same overall height as a colossal.

Because of how unwieldy this model was likely to be, I decided to rig it up so that the model could be removed from its base, greatly simplifying transport. To accommodate this, the square brass tubes would be given a set of thick wire “pegs” to slide over; these pegs are wound around the structures underneath the base, fed up through the top…

…travel up a bit, loop back down, and then hide back underneath the base. By using thicker-than-normal wire and planting each one twice through the base, the resulting pegs end up quite sturdy.
Also note: the two sides of the peg have been set up at a 45-degree angle to the model’s facing, so that they get caught in the corners of the brass tubes. This makes the fit much stronger.

Jumping ahead for a moment (I didn’t get an assembly photo at this point), here’s how everything rigs up in the end– stilts go over the pegs, bottom titan grips the stilts, middle titan holds the punching sticks.
Also: note that from here out, it becomes incredibly difficult to photograph the fully assembled model, due to how dispersed the components are from each other. I can get good detail shots of one feature or another, but full-height shots end up sucking a fair amount of ass.

Alrighty, back to the baby elephants.
The top titan will be shooting cherry bombs out of a slingshot, so I wanted to give him a look of intense concentration. His right eye is squeezed shut, and the left is only open a crack; he’s also sticking his tongue out one side, because that’s an essential part of good slingshotting form.
Apparently.

Getting the right eye to look closed was surprisingly difficult. I don’t think I wrinkled the surrounding meat quite enough.

Here I’ve added and posed his arms. That does a lot to make the figure come together– shockingly, armless torsos don’t tend to look entirely natural.

Next, I added some structural putty to the arm and started working on the “bomb purse”. Because, of course he needs a bomb purse.

The purse gets ribbing added around the edges and creases added on the faces. I’ll add the strap once it’s set.

Here you can see the simple skeleton of the slingshot. I used extra-thick wire to ensure it didn’t bend later on.

The slingshot was wrapped in putty, then I used an edged clayshaper to draw woodgrain on it.

Strap!
The strap took about 40 seconds to make– I laid a thin putty thread around the model’s torso, then squished it flat with a hoe tool.
I don’t even know why I’m bothering to mention it.
…
…
…alright then.

The top figure will be using his lower arms to prep bombs for firing, so naturally he needs a lighter to set the fuses. I sculpt it on a flat surface, and transfer it to the model once it’s solidified.

For all of the arms, I first used clayshapers to create smooth muscles, and then went back with the edge of a hoe tool to create the wrinkly skin texture.
It’s kind of amazing how ripped an agonizer’s arms are, compared to the rest of his pudding-filled body. It looks a bit weird, but at least it’s fun to sculpt. 😀

More beefy elephant arms!

At this point I started working on some more handheld accessories– the boxing-gloves-on-sticks. They started quite humbly as wads of putty on the end of brass rods.
Once those were set, I added cylinders for the wrist covers, and then more putty around the hand. I then squished this into a vague mitten shape, though I apparently didn’t take a photo of that when I was doing it. You can see it later on, I guess…

More accessories!
The top titan is shooting bombs out of a slingshot, so next I build those bombs. I built the spheres out of Fimo instead of Green Stuff since I was in a hurry to attach them– a Fimo piece of that size can be baked solid in under 15 minutes.
As for why I had Fimo out on my desk in the first place, that will have to wait until a future article. 😛

I cut the bomb fuses to a nice length, then used round jeweler’s pliers to curl them so that they’ll look floppy.
I loosely puttied the bombs into place right now just to attach them; proper detail on the fingers would come in a later layer.

This picture is a bit out of order, because I forgot to take a photo of the stick attachment when I did it. I slid the punching stick through the hand-loop, then sculpted a beefy arm and grippy hand around it. This single arm is probably my favourite part of the piece– I spent a lot of time getting the muscles laid out correctly. 😀

And here’s the reason the above is out of order: I hadn’t attached the stilts yet. But once I put those grabby sticks on, it was too hard to manipulate the model while it was still on the (now comparatively tiny) cork, so I went ahead and moved the whole arrangement from the cork to the stilts.
This appears to be another thing I didn’t photograph (I was working frantically on four projects that weekend, so the picture coverage is a bit spotty…), but if I’m remembering correctly, I drilled holes in the sides of the square brass tubes and ran the foot wires into them, then wrapped the hand wires around to hold it all steady. I secured it with glue, then sculpted the arms and hands on (as seen in the previous photo).
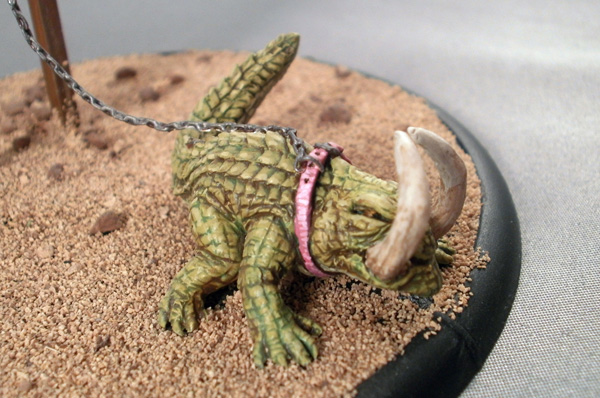
While all of that was going on, there was still one more figure to add to the model. Because while I’d already accounted for the Mammoth’s multi-ROF explosive ranged weapon and its twin open fists, it still had one remaining weapon I needed to model before this could be considered a valid proxy: the tusks.

The tusks would, naturally, be provided by the titans’ pet Tusky Lizard Thing, which is the first thing I’ve sculpted in years that didn’t start with a sketch on paper– I just wired up something I figured looked approximately like a stocky lizard and ploughed ahead blindly.

Sure, that seems like where he’d have bits and pieces.
*shrug*

At this point it occurred to me that it would be funny to make his face reminiscent of a bulldog, so I bulked that out.

That basic form was shaped and textured to still remain lizardlike.

While the head was drying, I started the limbs. I’d wired them up way too short, so the feet all ended up starting just after where the wire ends– a luxury you’re afforded when dealing with limbs held flat against the ground.

The mitten was divided into fingers, the various blobs were pressed into vague meaty shapes, and then everything got padded scaled pressed in with a hoe tool.
I honestly wasn’t that excited about the rectangular scales, but I was getting kind of desperate to finish the model, so I just kind of settled for it. 🙁

Once all the legs were done, I did the body in the same way. Bulk first…

…then moulded shapes…

…then texturing. I decided to put more effort into the back scales, which would be in odder shapes and slightly raised off of each other. I started by pressing out tracks along the back.

These were divided into segments (taking care not to end the segments in the same place to create a staggered pattern), and reshaped into a vague swept-back swallowtail pattern (eg, the outer rear corner being longer than the inner rear corner). A hoe tool sunk each scale underneath the one in front of it, and then I used an edged clayshaper to add texture lines from front to back.

This same process was repeated on the tail. Here’s an early stage, just after the scales were divided but before they were cleaned up or textured.

The tusks are plain tapering tubes with minor ridges pressed into the bases, and I laid out some understructure to later come back and create a collar.
Also at this point, I pulled the model off its cork to take a look at the underside.

Err.. wow. @_e

An hour later, it looks much better.

Fairly satisfied with the underside, I attached Tusky to the base.

This is where the model stood when I revealed it to Tom on March 26th– not finished, but advanced enough that you could tell where it was going.

RANDOM CLOSE-UP!

With the titans nearing completion and Tusky attached to the base, I rigged up his leash. I draped some fine jeweler’s chain (fine because of its size, not because of its value) through the mini arms, then used super glue– applied by transferring one bead at a time from a wire to the chain– into the links. After an hour or so, they’re frozen solid.

I then went back and finished the fingers and thumbs.
I think this shot is from midway through that process, because I think they look less horrible in the final shot. Not 100% sure though– this is all starting to blur together. >_<

COLLAR DETAIL!
I used the buckle-and-strap technique I discussed here; I thought this one came out quite nicely. 🙂

Once the collar was solid, I pinned in a piece of very thin wire, poked it through the chain, and then bent it back to the other side of the collar to form an attaching ring.
I left this removable at this point, as I didn’t intend to fully attach the chain until the model was painted.

I realized just before I was about to paint that the models didn’t have teeth.
I fixed that.

I took photos of the entire painting process, but honestly, I didn’t do anything terribly interesting on that end (it’s just a lot of beige and brown), so I’m going to skip all of that. The only two things I’ll mention:
1) The chain was rolled up and enclosed in masking tape during the painting process to keep primer out of the links and to keep it from annoying the hell out of me. The flapping tag was still kind of a pain. >_<

2) It was surprisingly easy to prime, as I discovered that it formed a natural tripod. 😀
Aaaaaaand let’s jump to the glamour shots, which were INCREDIBLY DIFFICULT to take– it’s hard to get a good photo of a model that has pieces shooting off in different directions. 🙁

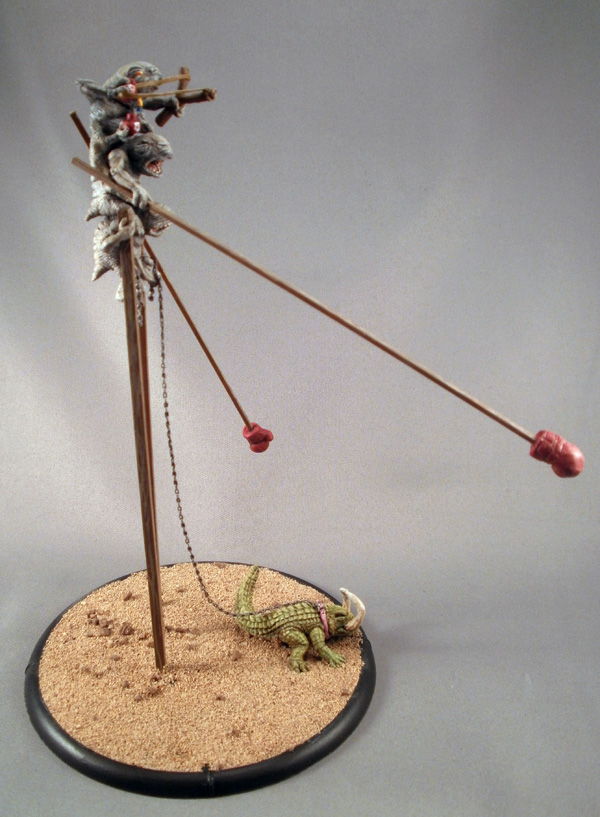


…and that’s what Tom got for three years of Christmases in one shot.
Merry Christmas in March, Tom!
There were two more projects done for this made-up holiday, but they’re both still in varying stages of completion, so don’t be surprised if I’m still posting Christmas presents through the end of July. 😛
And stuff!
I lurves my mammoth so
Really awesome job, Spud. Just fantastic. I wanted to say something funny or snarky but that’s just beautiful work.
The title of this blog site is an utter and blatant lie.
Tom is the Amazing one, and you are just a loud and obnoxious enemy of good taste.
I want to be reimbursed for the time I have spent on this page under false pretenses.
Also, nice work Mr. T…. Spud.
Part two, part two, part two!!