

Alrighty, where were we?
Right, still detailing the chest and back armor.
By this point I had figured out a pretty effective way to build the big gems. It isn’t anything terribly complex, mind you– you stick down a clay ball, then smush the edges of the ball flush with the surface using a metal hoe tool. Once you’ve made it into a vaguely hemispherical bump, you use the same metal tool to cut in slightly just above the surface to create that bottom ridge. Finally, smooth everything with a chisel clayshaper.
As for the spiky patterns, those are just clay placed inside the panel areas, smushed down to the surface, and then formed into spikes with metal tools.
Really, nothing I did on this project was that technically interesting, which is why I haven’t really spent much time detailing the “how to” for any particular section. Every piece is just some variation on “stick putty blob, smush into rough shape with metal tools, smooth with clayshapers”. That is literally the entire project from start to finish.
Hell, I could probably just stop writing now, you already know everything I’m going to say.
You’d all be okay with that, right?
…right?
…
*sigh*

At this point, with the torso taking shape pretty nicely, I turned back to the faces. Overall I quite liked how they looked, but they still seemed a bit too organic and not quite statuesque enough. So, I opted to increase their angularity, first by extending their chins into Egyptian-style square beards. Here I’ve planted some small wires into their chins to support the extensions.

In addition to the big chins, I also firmed up the facial angles a bit.

Alrighty, back to the skirt!
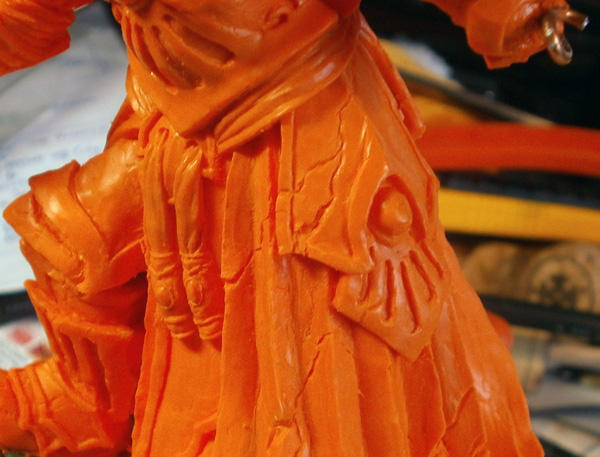
I really had done a pretty terrible job on the pleated skirt, so I opted to add some additional armor plates to cover part of it up.

The first layer for these was just to fill in the trenches within the desired area.

Next, I added additional clay to create what should by now be fairly familiar layered panels. I created one of these panel sets on each hip, and one centered over the butt.

Once they were in place, I turned back to the belly armor, which I guess I decided was currently ending too abruptly.

I decided to have it flare further outward to continue the pattern from the back plate; here I’ve laid a fat clay snake over the area I’m about to bulk out.
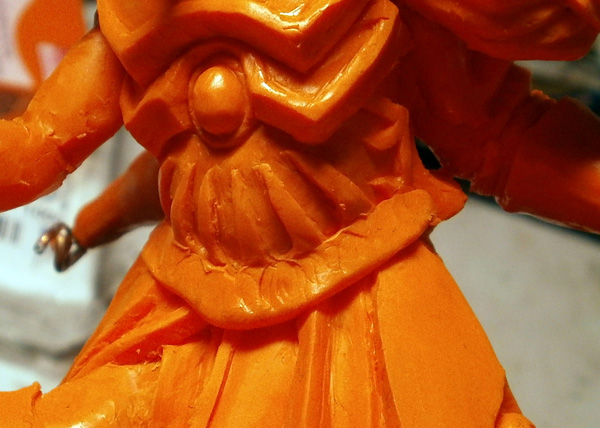
The snake was smushed down with metal tools, and then smoothed out with clayshapers (not pictured here, but you can see it a few pictures down). This really helped sell the illusion of the various lower body costume elements, as they were now disappearing underneath a top layer rather than simply ending abruptly at the waist.
It’s really important to think about things like that– if your costume doesn’t make sense, with articles tacked on haphazardly or not logically placed, people will notice. 🙂
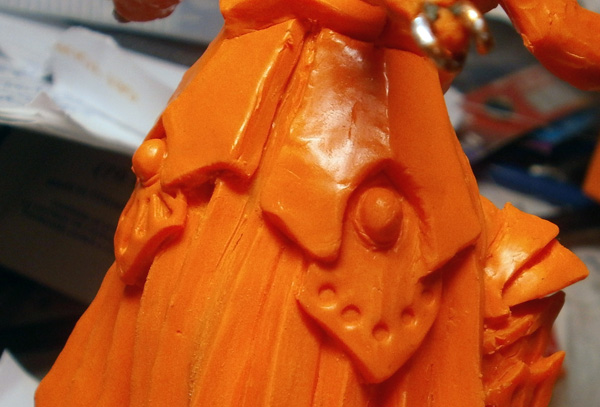
Here I’ve done the first step for creating the ribbed armor sections. Step 1 is to use a metal tool that ends in a circle to push circular indentations into the clay.
Steps 2 and onward… I didn’t take photos of, apparently. >_<
But, long story short, I then take the same blunt-ended tool and slide it through the clay, carving a wide trough. Once I’ve carved this out, I go back with flat clayshapers and clean up all of the edges.

Hey look, it’s the horribly lazy panel edging technique again!

Again you can see where it’s bulging out in the center of the low areas, since the clay has nowhere else to go.
GODDAMMIT 2-YEARS-AGO-SPUD, STOP BEING A LAZY JERK AND SCULPT BETTER!
*time travelling head smack*
Random layered plates for the inside of the bracers. I really like how these came out, actually– some of my favourite forms on the entire model. 🙂
Once I had a design I liked…

it was time to rinse & repeat for the other three arms!

I copied Makeda‘s dangly belt thingies because they look really cool and because my statue thing needed more detail around that area.
Now, I don’t remember all of the details, but at this point I had been working on the model for several months, and I needed to take a break to tackle some other projects. The clay I had been working on had stayed quite pliable the entire time, so I expected that its working time was simply unlimited.
However, when I finally picked the model up again about two months later, I found that a lot of the clay, especially the earliest parts toward the bottom of the model, had started to dry out quite substantially and were no longer really workable; they resisted the application of tools, and crumbled if pushed too hard. The areas toward the top of the model were still in reasonable shape, but it was clear to me that I was going to need to finish those areas up and bake them before any further damage occurred.
As a result, I spent about a week just smoothing the entire model from head to toe, crisping up edges and removing stray tool marks wherever I spotted them. This left the model looking pretty good, but there was one last thing I would need to handle before I could bake– I needed to cut cracks into its entire surface.
The pleated skirt, being dried out and crumbly, was actually quite easy to create cracks in, since it was essentially halfway to doing that on its own. The challenge was to create the same type of cracking in the softer clay.

My technique for the cracks was essentially to poke in the the tip of a pointy metal tool, and then drag it along while pressing down and wiggling it back and forth at irregular intervals.

As I went along, final detailing was added to a few areas that still needed it, like this back plate, which received a beaten metal effect by poking it with the tip of a round clayshaper.

No area of the model was left uncracked, including the cloth areas and the three faces.

Just before baking, I thought a bit ahead to the later stages of the model and realized that I would need some additional supporting wires to attach the elaborate headpieces; I would shape them later, but for now I simply dropped the wires underneath the head clay (with the submerged part having an L-shaped bend to keep it steady). The protruding parts were simply curled inward to keep them out of the way during baking.

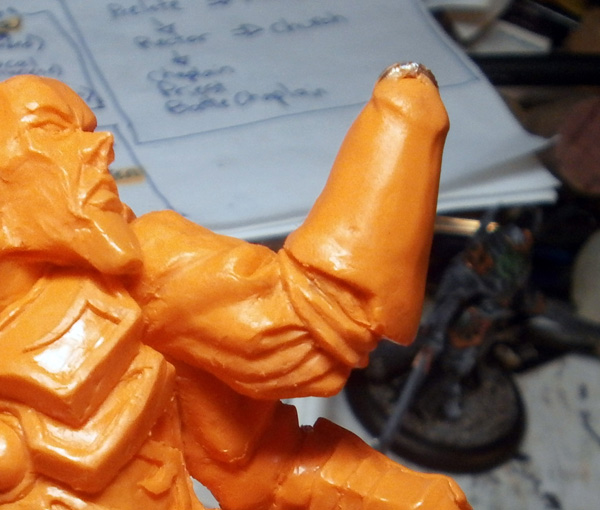
The final pre-baking prep revolved around the bracers; I loved what I had done on the insides of the forearms, but wouldn’t be able to sculpt the other sides until the hands were added. This was the one area I was really hesitant to put through the oven, as it really did represent unfinished work.
However, I figured out how to sort of make it work– I left the edges of the back-of-forearm plates intact, and then simply dug the bulk of the forearms out with a knife.
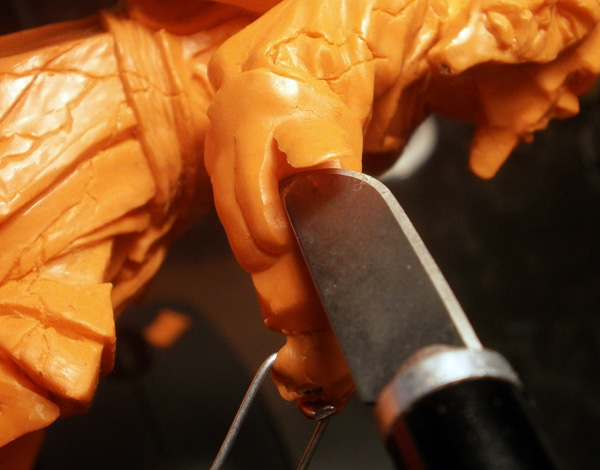
The holes created in this way allowed me to come back toward the end of the project and fill back in with fresh clay without immediately hitting a hard wall right under the surface.
With all of that cleaned up, the model took its second trip to the fire jar.
At that point I took another break for a few months. When I returned, I decided to work on the headdresses, which were probably the largest remaining areas that hadn’t had any significant work done on them yet. I had sketched them a few times on the preceding concept drawings, but this time around I sat down and decided exactly how they would look. I really love the design I came up with here, and if I’m being honest, the project would have really benefited if I had given the entire model the same level of pre-planning instead of sculpting most of it from rough sketches and figuring out the armor plates on the fly. :/

As you’ll recall, I embedded some wires in the model’s heads to act as supports for the headdress pieces, but hadn’t shaped them yet. To create the shapes I was after, I cut a small paper template in the shape of my sketch and at the correct size to fit the model’s heads. In the picture above it’s just the bottom part of the paper– the top 80% is just a handle to let me hold it.

It was fairly difficult to transfer this design to the actual model; I believe I had someone else hold the template in place while I bent the wires. This is why I usually create wire rigs away from the model and only attach them once they’re finished– trying to work on them in place just tends to be awkward as hell. >_<

Once the wires were correctly shaped, I locked them in place and filled them in by covering them with a thin sheet of Green Stuff.

Once this was set, I started applying chunks of Fimo over the support rig.

…giving us this somewhat odd-looking beast. 🙂

Apparently I then cut cracks into them and baked them? Looking back on it now I don’t know why that was necessary, but apparently it’s what I did, so… yeah. :/
Also: ZOMG, THE FIRST EVIDENCE OF ME DOING EDGE TRIM PROPERLY! @_@

With the headpieces built and edged, I now needed to add the curly spiky bits on the inside of each face. Rather than sculpt these in place, I transferred my paper template to my vinyl working mat and used the space within the pencil lines to sculpt the detail bits directly on the surface in front of me.

Each curvy bit was constructed from two small shreds of clay.

These were squished into each other and shaped to match my design drawing.

Once they were done, I lifted them onto the model using clayshapers.

These were then pressed into place, with their outside edges carefully bonded to the under-surface using another clayshaper.

The bottom part of each curl was sculpted directly in place, as it wasn’t nearly as complicated at the top part.

Once the sides were done to my satisfaction, I added the front detail, which again I totally love. If I had to pick one part of the model that turned out exactly how I wanted, it would definitely be the headdresses. 😀
(And apparently I baked it again, judging by the darkened colour of the clay in this picture. Again, I’m not sure why that was necessary.)

I then moved a bit lower and started building the parts of the helmet that wrap around the faces. First I built a sort of cylindrical housing that would provide the mass for the various bits of the helmet; mostly it would get dragged around and pulled apart to form whatever shapes I needed later on.

I then created these little shield-shaped pieces, which curved inward to link the perpendicular headdress pieces together.

Same deal on the back. The cylinder is now mostly gone, surviving only in that little circular bit right at the top.

I then continued downward from the shields. The idea I was going for was to have shapes that could plausibly have worked as a single-headed helmet, but which would sort of twist outward to blend into the next head over.
If that makes any sense.

After some experimentation, I decided that I liked the shields in a more complex shape with a bite taken out of each side. I also made up my mind and decided to make the hanging parts concave rather than convex (if you look back at the previous image, you can see where I had both styles at the same time while I was trying to decide).

Oh good, we’re back to the crap method.
If you were afraid that Spud was at risk of growing as a sculptor, don’t worry– there was never really any danger of that occurring.
>_>

Sigh.

OH YEAH THIS TOTALLY LOOKS GREAT LET’S KEEP DOING THIS ALL OVER THE PLACE

At least it looks okay zoomed out.
(Also, whoa… no idea what’s going on with the light here…)

I baked the work to date, and then the only major remaining section was the arms. These were going to be fairly awkward to work on in-place, so I opted to separate the arms from the rest of the body. To do this, I simply cut through the Fimo with a knife (it has a similar consistency to GW hard casting plastic, so a sharp knife has little trouble going through it), doing my best to follow the edges of existing armor plates to avoid creating visible seams.

I still wanted a way to reattach the arms whenever I needed to, so I drilled into both sides of the shoulders to allow me to embed a peg.

Pegs were created using square brass rods, with some putty plugged into the end to close them off.

A matching square hole was created in the torso using putty to fill the gap. The square pegs and holes helped to stop the arms from rotating while in place.
Consult the Book of Armaments

Alrighty, let’s take a look back at the swords now. I had actually been working on these all throughout the project, but I’ve opted to consolidate all of their process photos into one chunk so that they’ll be easier to follow.
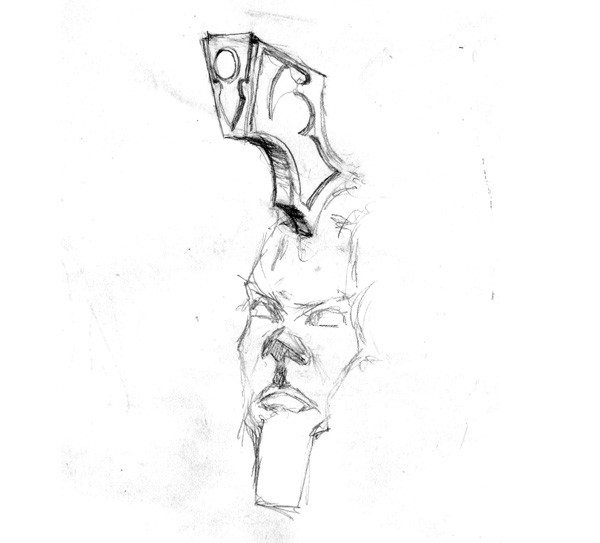
As mentioned the last time we saw the swords, my initial design pass was kind of horrible, and needed some revision. After going back to my concept drawings, I came up with a shape I was much happier with:
This design really seemed to do a better job of communicating the vast weight of the swords, which I imagined to be crushing weapons in spite of their ostensibly sharp front edges. Removing the pointy tip and shoving the majority of the mass to the far end turned them into brutal, somewhat clumsy weapons designed to be swing in a very long, powerful arc, which seemed to suit my mental image of the graceful yet slow-moving giant statue.

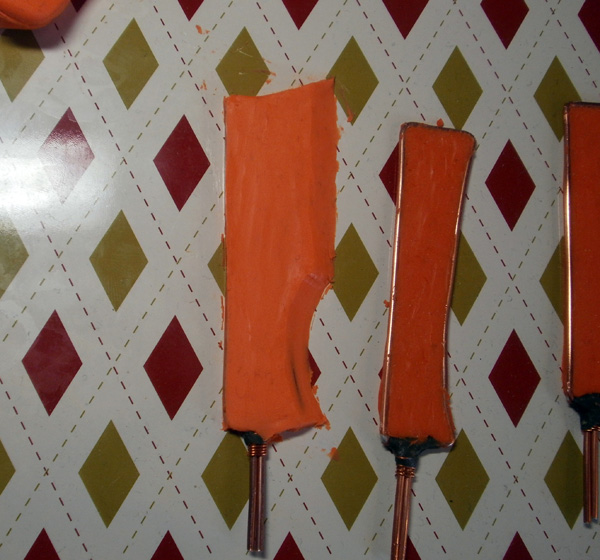
Once I had a silhouette I was happy with, I applied clay to the other three swords to mimic the same shape.

They weren’t completely identical since I wasn’t working from a paper template as I should have been, but I called them “close enough”. 🙂

I did a lot of careful fine tuning to get the silhouettes exactly how I wanted them. Here I’ve shaved off part of the top edge to make the heavy half of the blade more rectangular, and added a bit to the very bottom to make it poke out more.

Once I was happy with the blade, I started creating the crossguard, which is really just a brace to attach the huge stone blade to the handle. I imagined the blades getting smashed fairly regularly when this construct went off to war, and its weapons thus being designed to have newly-hewn blades slotted in for the old ones as needed.

The attachment brace shapes are probably my second-favourite detail on the model, after the headdresses. I just really like the swoopy spiky shapes I came up with. 🙂
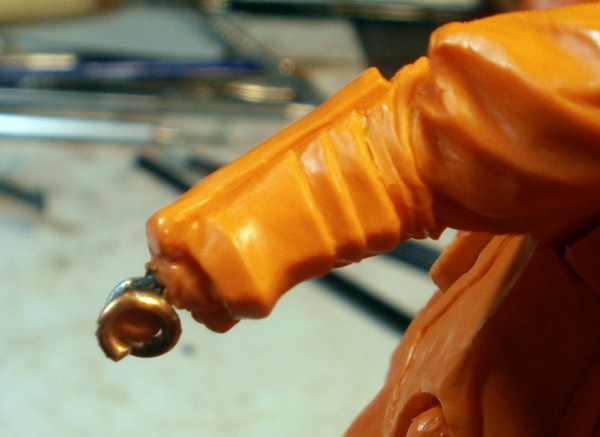
The handles were going to have a spiralling grip pattern carved into them, with metal bands around the top and bottom and a big metal pommel at the bottom with a tassel coming out of it. The handles I originally rigged up in wire weren’t long enough to accommodate all of this, hence the mass of added wire and Green Stuff that I haven’t explained until just now. 😉

Here’s the above sword with the details cleaned up. Note that getting the blade to be even as smooth as it is there took several days of work– it’s just nightmarishly difficult to get a totally smooth surface on a piece this size.

The edge trim on these pieces was done the correct way, by laying clay snakes around the edge and smushing them into place. This method takes longer, but the results are much better.

The first sword was looking pretty good, so I started working to duplicate its details on the other three swords. The elapsed time between the previous photo and this one is probably about a week and a half.

Because it still hadn’t occurred to me to create paper templates for the swoopy braces, I recreated the pattern on each one manually with this custom mini “ruler”.

The back of each brace was as wide as the paper bit, and the tick marks drawn on it allowed me to recreate the placement of the various details fairly accurately.

Here are the completed first sides of the swords, after about four weeks of work. I don’t have a photo of it, but you can sort of tell from the shadows in the photo above that I’ve used a knife to carefully cut out some material all along the front edge of each sword. This is because I don’t actually want the final swords to be twice as thick as I currently have them once I flip them over and sculpt the other side; I want to add only about 1/2 again as much width, which means I needed to move the sharp edge inward to about the center of where the wire rigging currently sits, leaving a gap between the sharp edge and the metal surface I was working on.

You can see the baked swords at the top there. For the next part, I debated filling in the backs of the swords with my usual “fifty small bits of clay that get smushed together” technique, but decided instead to try cutting the shaped out from a pre-rolled sheet of clay to see if that ended up being faster and/or cleaner. To create the uniformly-rolled sheets of clay, I stacked up thin sheets of plastic (actually vinyl siding samples from Home Depot), put a lump of clay in the middle, and then rolled it flat with my kitchen rolling pin; the stacked-up plastic sheets kept the rolling pin elevated at a consistent height, so the clay ended up about 2mm thick as I had wanted.

Once the sheets were created, I laid a sword on top of each one and used a knife to cut the correctly-shaped silhouette out of each one.

Excess clay was pulled away.

The whole thing was then lifted up… with great difficulty, ruining the clean face I had been hoping for. Apparently Fimo really really likes smooth plastic and doesn’t want to let go of it. Next time around, I’ll roll them on a sheet of plastic film that can simply be peeled off afterward.
Lesson learned, I guess. 🙁

Once the clay was in place, I started shaping it to match the original side. This took quite a while and wasn’t ultimately totally successful– making things match is hard. 🙁

Anyway, I ended up hating my rolling method, so I want back to the normal method for the remaining swords.

Hey look, a finished sword! 🙂
I mounted each sword to a plastic sheet to make them easier to hold while working on the reverse side. This wouldn’t be a permanent mounting since plastic can’t go in the oven (obviously), but it would be easy enough to pop them off just before I baked.

MORE DUPLICATION!
This project really reminded me how much I hate repetition. Building the first sword was fun and interesting; building swords #2 through #4 over the course of six weeks was agony. ;_;
But anyway, eventually all four were done. I had baked the first sword right after it was finished a few weeks before so that it could be used as a model for the others; once the last three were done, I popped them into the oven and baked them as well, so that I could proceed with attaching them to the model.
This occurred in the evening on a weekday, after I had used the halogen oven to poach some salmon while my apartment’s archaic kitchen oven was on the fritz.
Salmon, incidentally, typically gets poached around 400°F. Halogen ovens can be set lower than a normal oven, so I did mine around 350°. It turned out pretty nicely.


Yup. Amazing.
This is amazing, you always do such amazing things.
When will we get to collaborate on a project?!?
1) Which is why I try to warn everyone by way of the site’s title. I don’t want to catch anyone off-guard.
2) You said you would find out if I’m allowed to help you and then get back to me.
That was, like, eight months ago. 😛
Here’s an older maquette step by step that would be a good reference for sculpting larger things. http://www.conceptart.org/forums/showthread.php/18287-Smellybugs-Maquette-Tutorial-completed!/page15
Love what you did here, really makes me want to try and sculpt something of my own.
I hereby resolve, in my next sci-fi RPG campaign that might require giant stompy robots, to introduce the awesome concept of “Del Torium” in the midst of a bunch of backstory technobabble, and to do so while keeping a straight face.