
Thursday
Also known as “my actual birthday”. 🙂
Facebooks!
I took a four-day weekend off for my birthday. Hoping to fully sculpt a model by the end. We’ll see. 😉
Pictures to be added as things progress.
Facebooks!

My concept drawing. I’m trying a different body type than my typical lady models– this one will look like she could lift a car. 😉
I’m a fan of using animal motifs in character armor because they’re a quick way to communicate personality traits without doing any actual work. For this character, I chose the emblem of a ram, because I wanted to emphasize: #1 power, and #2 a generally disagreeable demeanor :P.
I dressed her in a piecemeal array of heavy plates, incorporating the ram emblem into her hammer and one gigantic shoulder pad. The areas around her knees and elbows were left clear of plating, as I envisioned her prioritizing mobility and charging speed over personal safety.
The vast majority of my sculpting work is done at 30mm scale. Even the larger pieces I do (Trollkin, the Dynastic Council, etc.) are at that same scale– they’re just supposed to be larger people than the ones who actually fall at 3cm tall. I keep to this scale for a pretty obvious reason– my models are mostly sculpted as game pieces, and they’ll look strange next to their brethren if they’re any larger or smaller.
For this project, however, I was creating a model that wasn’t intended for any gaming table; I just wanted to sculpt something cool, and so I was free to make it whatever size I liked. Given that unprecedented freedom, I decided to allow myself a bit of fun by sculpting a model at 40mm scale.
That may not seem like a very big difference, but it ends up making everything vastly easier, because while the dimensions only increased by 1.33, that corresponds to nearly doubling the area of each piece. Which means that I had twice as much room to detail the face, the fingers, and every other detail of the model.
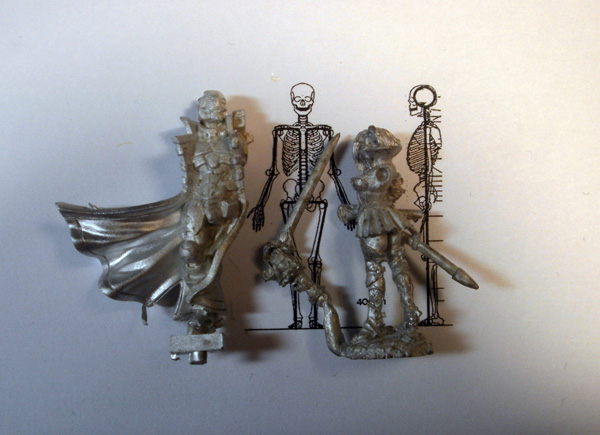
The image above shows the skeleton diagram I’ve been using for years, courtesy of Patrick Keith, which I blew up in Photoshop, modified for female skeletal proportions (smaller ribcage, larger pelvis, same size limbs), and then printed out to let me begin creating the skeletal armature. I’ve placed two models beside it to give you an idea of the size– on the right is a fairly average Reaper mini, while the left is the tallest Infinity model I could find in my collection. Ram Lady will tower over both. 🙂
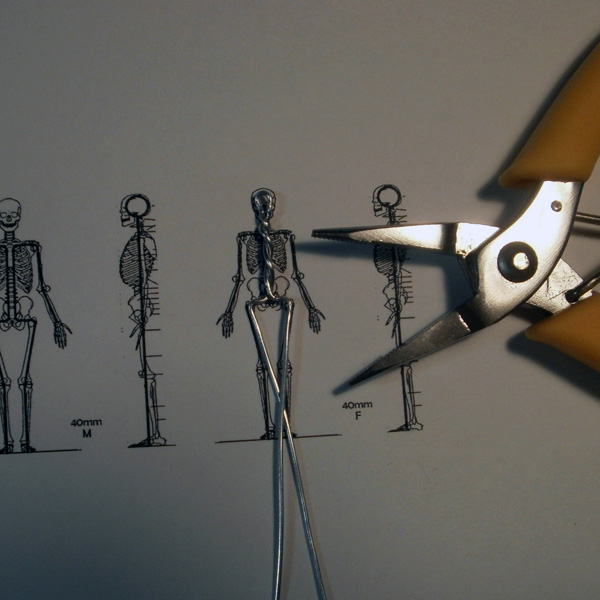
As usual, the armature is twisted from 20ga aluminum picture wire. A loop is created for the head, then the two sides of the wire are twisted down the spine before being split apart to form the legs. I make sure not to let the wire go out too far on the hips, as this will generally poke out of the final model.

The armature is then turned sideways and given some additional adjustments– creating the feet, curving the lower legs backward slightly, and creating an inward dip in the lower spine (not pictured, but visible a few pictures down).

The arms are created as a separate piece, with a tab in the center that will make it easier to attach them to the spine.

Both wires before mounting.

The feet were sunk into a wide cork, and then everything was carefully twisted into the desired pose with pliers. I ordinarily attach the arms to the torso only with glue and a bit of putty, but the larger scale of this model afforded me the extra space to wrap a thinner wire (22ga, I believe) around both pieces to keep them firmly together.
Facebooks!

Thursday 10am: wire armature complete. I’m sculpting the model at 40mm scale to give myself more room for details.
Facebooks!

Thursday noon: clay over most of the model.
Quick summary for anyone who’s new to the Spud Sculpting Process: Fimo doesn’t stick to metal. To get the first layer on the model, Green Stuff epoxy putty is first applied directly over the entire wire skeleton, and then Fimo is wrapped around the Green Stuff while it is still soft and uncured. This allows the Fimo to bond to the skeleton without sliding off.
Once the base layer of Fimo was in place, I started applying small bits of clay to bulk out major muscle areas.

These were blended into the foundation layer to fill out the required volumes. At this stage I wasn’t trying to create the final musculature levels yet– just to start building up the areas in the first of what would be several incremental additions.

Basic volumes on the back.

These were bulked out with additional clay (mainly around the thighs, but also a bit on the calves), then given an initial smoothing with clayshapers.
Facebooks!

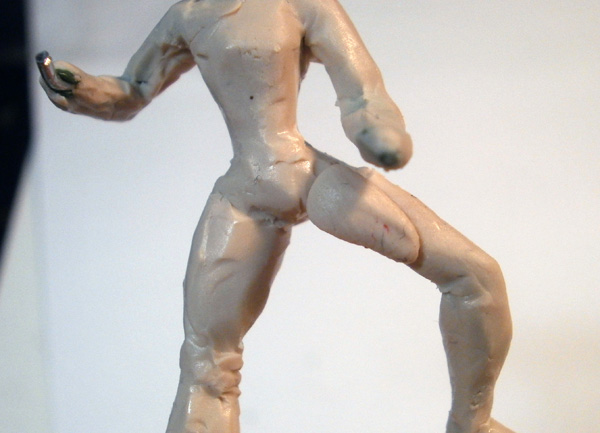
Thursday 2pm: Lower body musculature (front). The model will eventually be almost totally covered with plate armor, so muscles are only being built as vague shapes instead of being clearly defined.

Next, I moved on to the upper body, where I started filling out her shoulders. Here you can see how I typically apply clay to the model– not as a single large wad, but as a cluster of small scraps that I subsequently blend together.

…like so.

The upper body has a more complex array of muscular clumps that need filling out, but they all proceed much the same (apply scraps, blend and position with metal tools, smooth with clayshapers), with material laid down on the back muscles, belly, shoulders, and biceps.

I’ve been drawing superheroes since I was 9, and at this point I can draw a reasonably accurate muscular body from most angles without any need for reference. However, this really only applies from the front– back muscles, whether male or female, are probably the only muscular anatomy I’ve never been able to completely memorize. I don’t know exactly what the mental block is there; I think it might be the fact that the muscle groups don’t poke quite as clearly out of the skin the way they do on a very toned abdomen or arm, forcing me to make guesses based on whatever small bumps I can see protruding.
So when it came time to render the model’s back, I had to carefully follow my anatomy guides and the fortunately plentiful reference photos and videos of Miss Massey that Google provided me, Here I’ve applied material for the little “chestnut” where the shoulder muscles slide underneath the triangular spinal muscles (yeah, I don’t really know any of the names… grade 9 health class was so long ago… >_< ); it starts as a tiny ball like the one on the left, and then gets blended in like the one on the right.

The muscles of the back are ropes that all converge and attach to a point just above the pelvis. This central hub has very little muscle over it– rather, it’s a junction point where tendons and other tissues grab onto your vertebrae. As a result of all this, that point on your back tends to be “sunken” in compared to the surrounding areas, regardless of whether the figure is muscular, skinny, or even obese.
Thus, when creating lower back muscles, I apply cords of clay, but take care never to let them spill over into that sunken area. The lower cords are the top regions of the butt muscles, while the higher cords eventually lead into the side muscles that give really muscular people their triangular torsos.

Once it’s all applied and smoothed out, you end up with a flat diamond-shaped pocket in the small of the back

Turning back to the front, I added one of the few bones that still pokes through even heavy musculature– the collarbone, which runs a straight line from one shoulder to the other, with a small dip in the center just under the neck (added in the next shot).
Facebooks!

Thursday 4pm: Upper body musculature (front). Putting more detail into this part as the entire left arm and right upper arm will be visible on the final model.

Thursday 4pm: Upper body musculature (back).

At this point I spent a few minutes smoothing and evening things out. I balanced out her boobs slightly, and roughed in the abs. I also returned to the lower body briefly to add additional volume to her thighs, which appeared slightly undersized now that the upper body was there to compare against.
Facebooks!

Thursday 5pm: Last update before heading out for dinner. Added the always-creepy skull in preparation for sculpting the head later tonight, and put a penny in the shot for those wondering about scale.
One really important note about the skull: this was the point at which I officially changed the model’s scale from 40mm to “Uh… 42? Maybe 43ish?” See, back when I was fusing the leg/spine armature piece with the arm piece, I mounted the arms ever so slightly too high on the spinal column. The placement was probably only about 1mm off, but the result was that the wire piece that remained poking above the shoulders, which is supposed to carry up to the model’s full head height, only stuck out to about where her nose needed to end up. There wasn’t any way to fix this at this point other than to start over, so I made the only correction left to me– I made her taller, with the top of her skull ending about 3mm higher than the original wire.
In the case of this particular project, this adjustment made essentially no difference, because a display model’s scale is fairly irrelevant. However, if this was being sculpted to fit into a tabletop game’s minis range, this type of “small” adjustment would be a complete deal-breaker; a few millimeters more or less is what created some of Privateer’s most famous off-scale models. The Black 13th are about 2mm short, and everybody calls then “ridiculously tiny”. The Convergence bird lady is 2mm too tall, and she towers over other human models. 2mm may not be a very significant measurement in our world, but at a 30mm or 40mm sculpting scale, it tends to be extremely obvious to any moderately interested observer.
This is why it’s so completely crucial to get the skeletal stage of the model absolutely perfect before moving on. And it’s one of the biggest lessons that I still need to learn as I progress– I always rush the skeletal stage because I find it really boring, but it’s absolutely the most crucial and irreversible step of the process. Time spent on the skeleton is never wasted.
I just wish it was more fun. 🙁

The skull was left to cure overnight. In the morning, I began applying a thin base layer of clay around it, using an even thinner interstitial layer of additional Green Stuff to bond the two.

Moving around the skull, this eventually yields the classic “ninja mask”, which gives the higher layers of clay something to easily adhere to.
Facebooks!

Thursday 11pm: Back home and back to work. 🙂 Clay laid down over the skull; hoping to lay down most of the face meats before bed.
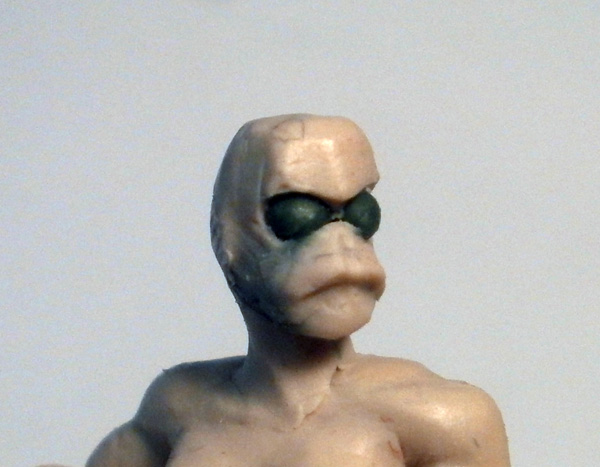
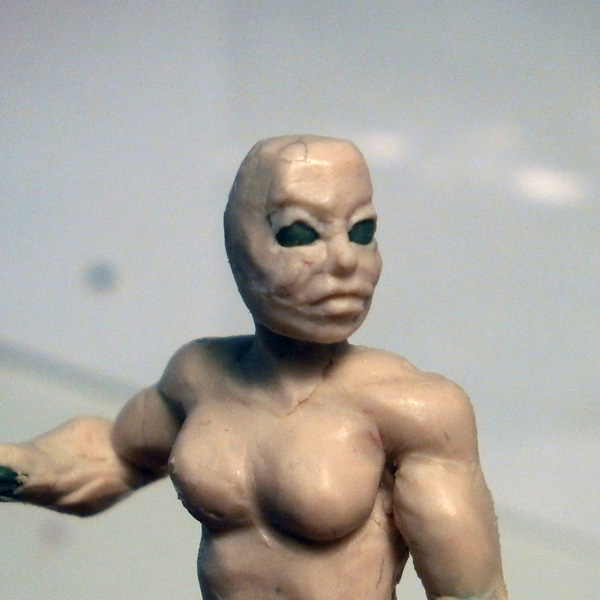
Once the ninja mask base was down, I started adding basic facial forms. I always prioritize adding the mouth before anything else, as it represents the second most important landmark on the face (after the eyes) for locating all of the other features.

A new clay scrap went underneath it and was blended into the chin and cheeks. I couldn’t locate any profile photos of my unwitting model to tell me how far forward to place the mouth, so I just sort of guessed. :/

With the mouth line set up, I started adding more material to her brow to bring the average line of her face further forward relative to the eyes. I also filled in the gap between them to give me a spot to deposit her nose.
I next added the bridge of the nose; still to come later would be the two nostrils and the bulb, though I would need to fill out her cheeks more first.

Continuing around the face, I applied some very small slivers of clay above her eyes and blended them into her brow.
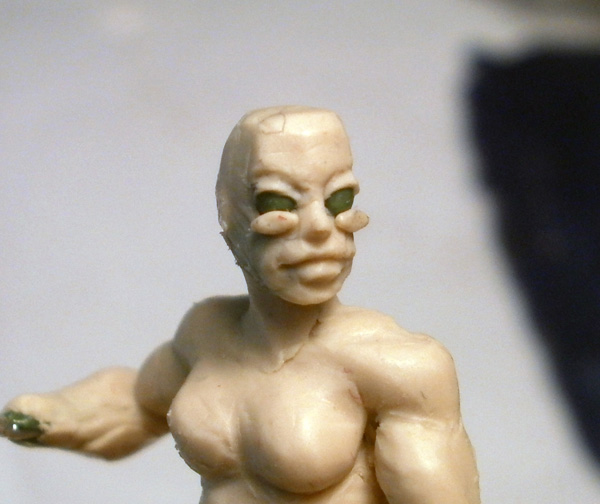
Two more slivers underneath formed the lower lids.

Which were, again, blended into the surrounding tissue.
This left the eyes well-framed in the center of the face, but they were far too wide, ending all the way on the side of her head. I applied some clay around the outside to begin closing them off.

With the major volumes in place, I went in with a clayshaper and started smoothing and rounding everything. I cleaned up the outline of her eyes, and added some definition around her mouth (while avoiding creating any outright creases, which would immediately age her).

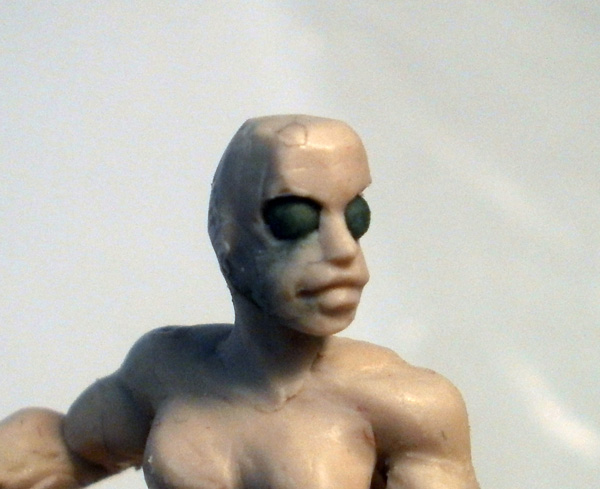
At this point I had a pretty convincing “blank” face; the remaining steps would be about making it more specifically look like my reference model.
With that said, I had never sculpted a likeness of a real person before, so I wasn’t planning to pressure myself into creating a perfect facial match; I just wanted to create someone who had the same general type of face.
Facebooks!

Friday 1am: Basic face meats added. I must have done a pretty reasonable job because Facebook is trying to identify her on my Friends list. XD
“Name me ten old man characters in fantasy and sci-fi. Now name me three old women. The second list was a lot harder, wasn’t it?”
Much harder.
I came up with Zhaan from Farscape (actress was 47 when the show started), McGonagall from Harry Potter, and Ripley (Weaver was 30 when they filmed Alien, and nearly 50 for Alien 4).
Thin pickings.
This is freakin’ amazing. If/when you get casts made, definitely count me in.
Her underlying physique is conveyed very well; I think you nailed your goal of “fantasy armored muscle pixie”. The hair cut does a lot to solidify that. The fur on her cloak is phenomenal – as a painter, I hate it when texture is phoned in. I just as tedious to paint each strand (I imagine, never having sculpted fur), but the effect is incredible when done. Bravo for taking the time to do it. Also, the ram on the hammer is one of my favorite parts, along with the thigh armor.
Do you have any plans to try your hand at a bust? I think you’d have a lot of fun in that kind of exercise, both academically (muscle, structure) and artistically (conveying character with only the head as the medium).
Holy Crap, Spud! I love to read your stuff but 7 pages at once… is there any way you can post shorter installments? Even if you write it all up at once I’d rather get a page a day over a week than what you’re currently doing. I haven’t even made it all the way through your last post yet (the orange one) even though it was really interesting. Please? Think of the children!
Actually, the length of the articles hasn’t increased that much– I average about 7,000 words, and this one is only a bit longer at 10,000.
The only real change that happened with the sudden appearance of pages (which I added to the blog in September) is that I’m now trying to give people a mechanism to remember their place in case they need to come back and finish later. As opposed to before, when I forced people to wade through 7,000 words all on one gigantic page.
So *actually* this is me being a super nice guy.
You’re welcome. 😛
As for releasing in installments, I’ll probably never do that. I personally can’t stand consuming any sort of entertainment in delayed chunks– for example, I only watch TV shows once they’ve been cancelled. When I start a story, a movie, a show, or whatever else, I want to do it knowing that I will be able to finish the entire thing at whatever pace fits my own schedule.
So, yeah. I hate it when installments are foisted upon me, and so I would never do that to all of you nice people.
<3
You’re my new hero!
I’ve been hunting for non-ridiculous female minis since 1990. I’ve managed to find a few in all this time. Not nearly as many as I would have liked. They all had things wrong with them. Whether their poses made them look like they were holding their bladders, or it looked like the sculptor simply glued two bb’s to the chest of the model to make breasts, or they looked fine, and then I realized they weren’t wearing trousers.
Later in life, I learned to sculpt things like pants and shirts on to the models myself.
Sir, you have created a masterpiece! If you ever create copies and would like one painted up, I would consider working on this model a true honour.
P.S. Have you let your inspirational subject know about this? She’d probably be thrilled on the quality, and I think this would make her day
Yours most sincerely, Robert
54mm is a scale people game in. Just saying…