The Purge
Site B - Attack/Defend Scenario
Mission Briefing

Administrator Jayanti
Commander, there is a sensitive matter that I need you to look into.
As you may have heard, the Governor was attacked yesterday while attempting to board his shuttle. He survived, and is now recovering at a secure medical facility.
However, I have some... concerns about his behaviour since the attack. Most notably, Aleph has discovered that just before being taken into surgery, Governor Prescott tasked agents to visit a remote pharmaceutical manufacturing facility run by the Rejkjar Bionetics Corp south of Valkenswijk. He stopped to give this order just before heading into major surgery.
That is a... very odd arrangement of priorities, Commander.
I would appreciate it if you would investigate this site to determine what the Governor's interest in it might be.
I am sorry that I cannot be more forthcoming at this time. I do not wish to speak out of place if this turns out to be nothing. It... probably is nothing.
Either way, your discretion is appreciated.

 Print
Print
Mission Objectives
Attacker (Combined Army)
- 1 For each Sample you destroy (max 6)
- 1 Kill all Lab Techs
- 1 Control one or more Salvage markers at the end of the game
- 2 Your Spec-Ops either damages an enemy model, or succeeds on a roll that completes an objective.
Defender (Human Coalition)
- 4 Kill more than 225 enemy Army Points
- 2 Kill between 151 and 225 enemy Army Points
- 1 Kill between 75 and 150 enemy Army Points
- 1 For each two Lab Techs not in a null state at the end of the game (max 3)
- 1 Control one or more Salvage markers at the end of the game
- 2 Your Spec-Ops either damages an enemy model, or succeeds on a roll that completes an objective.
Terrain
- A human research lab.
Deployment & Setup
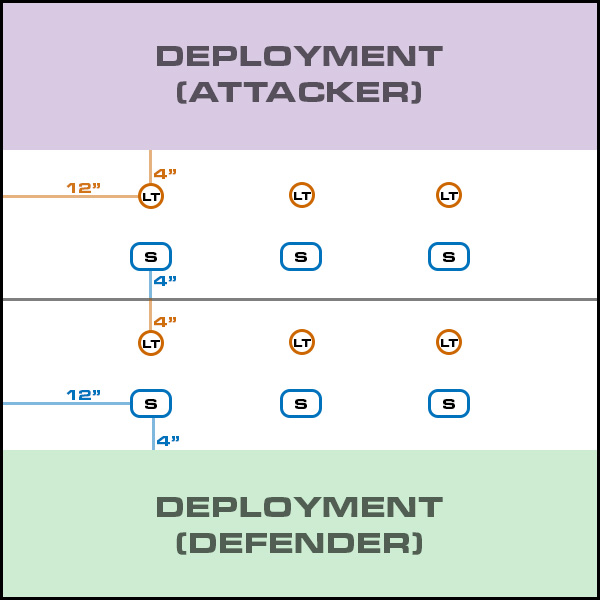
- Before the Initiative Roll is made, after both players have chosen their Army Lists, place the following as indicated on the map above:
- Six Lab Techs (LT)
- Six Samples (S). Samples are deployed by applying a variant of the Dispersion rule. The players will place 6 Circular Templates as shown in the map above, placing one of the Samples in the center of each of the Circular Templates. Then two rolls will be made for each Sample to determine its final position. The second digit of the first result marks the distance (in inches) the Sample is placed from the center of the Template, and the second roll marks the direction of the dispersion roll. If any Sample lands in the same place as another Sample or ends up inside an area with no access, the dice must be re-rolled for that Sample. After all the Dispersion Rolls are done, the Circular Templates are removed from the table.
- Both players will deploy on opposite sides of the game table, in a standard Deployment Zone 12 inches deep.
Special Rules & Objectives
- Samples: There are a number of Samples scattered about the map. Samples have 4 ARM and 2 STR. Each Sample has one additional property, rolled randomly after models have been deployed:
- [01 - 05] - Volatile: When this Sample is reduced to 0 or less STR, all models within 2" of it suffer a DMG 14 Fire roll against their ARM.
- [06 - 10] - Disruptive: When this Sample is reduced to 0 or less STR, all models within 4" of if suffer a DMG 8 E/M roll against their BTS.
- [11 - 15] - Nanocloud: All PH rolls and Doctor rolls attempted within 4" of this Sample receive a +3 bonus.
- [16 - 20] - Dataphage: All models may treat this Sample as an enemy Repeater.
- Lab Techs: The six Lab Techs are friendly to the Defending player and use the following profile:
- 385/Blue/Tangible: The Attacker's army must include the following model, at a cost of 88pts and 2SWC.
As a shord skill while in base contact with a Sample, a Specialist model may attempt to salvage equipment from it by succeeding on a normal WIP roll; a Combined Army model suffers a -3 penalty to this roll, while a model from any Human army suffers a -6 penalty on this check. On a failure, this roll cannot be reattempted on the same Sample by that player's models, but may be attempted on a different sample. On a success, the Specialist model secures a Voodoo Tech Sample; place a Salvage marker beside the Specialist model. Each model may carry a maximum of one Salvage marker.
At the end of the game, any player who controls one or more Salvage markers will secure the Voodoo Salvage campaign reward for his faction.
LI |
Lab Tech | ||||||||
| MOV | CC | BS | PH | WIP | ARM | BTS | W | S | |
| 4-4 | 8 | 10 | 10 | 14 | 0 | 6 | 1 | 2 | |
| Qualities | Extremely Impetuous | ||||||||
| Special | Lab Techs may only Dodge and perform Short Movement skills | ||||||||
Lab Techs do not receive an active turn, but may perform AROs. Lab Techs are considered to begin the game in Retreat; at the start of each of the Attacker's turns, all surviving Lab Techs will Impetuously move toward the Defender's deployment board edge. The Defender determines the AROs and Impetuous activations of all Lab Techs.
HI (Hackable) |
Node 385/Blue/Tangible | ||||||||
| MOV | CC | BS | PH | WIP | ARM | BTS | W | S | |
| 4-4 | 17 | 13 | 13 | 16 | 5 | 6 | 2 | 6 | |
| Abilities | G: Mnemonica, Lieutenant, V: No Wound Incapacitation | ||||||||
| Equipment: | Cube, CH: TO Camouflage | ||||||||
| Weapons: | Sepsitor, Plasma Rifle, Nanopulser, Pistol, Shock CCW | ||||||||
385/Blue/Tangible is a character model and is therefore subject to rules for Character Death.
Campaign Reward: Voodoo Salvage
- 01 - 04 K1 Rifle
- 05 - 08 Nanoscreen
- 09 - 12 S: Protheion
- 13 - 16 Plasma Rifle
- 17 - 20 Multispectral Visor Lv.3
Salvage crates secured during campaign missions become available for upgrading friendly Spec Ops models during the campaign. After the mission, roll to check each crate's contents on the salvage chart at right. The rolled upgrade becomes available to be purchased by any ONE allied Spec-Ops during the campaign at a cost of 2XP.